You are using an out of date browser. It may not display this or other websites correctly.
You should upgrade or use an alternative browser.
You should upgrade or use an alternative browser.
Dengfu E22 Frame Thread
- Thread starter Neeko DeVinchi
- Start date
bram.biesiekierski
Active member
Or have someone living local take delivery of the controllers/motors and send privately to the states
I suggest a group buy, I believe the shipping cost could be minimum, if divided by at least 3 or 4 people. M620 is heavy like a motor on my moped, that is why shipping is quite high. I am not sure about the controller itself, is it just plug an play if you already have the motor from local source, that is also a question for them..
Hey @Neeko DeVinchi (and anybody else who has the Eggrider V2), I've just got myself an Eggrider and am looking at the setup, have a few questions:
Cheers
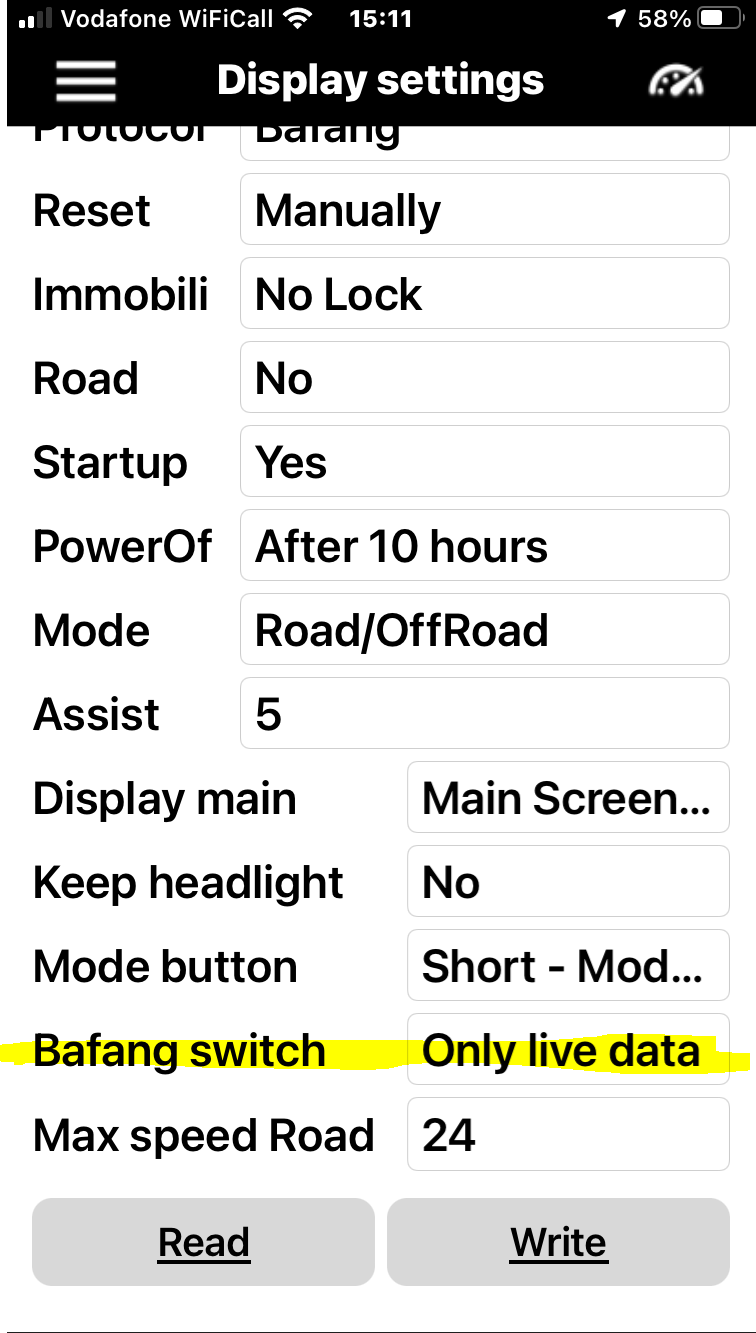
- Are you guys using the basic 'Only live data' setting against the 'Bafang Switch' parameter?
- As I understand it, this method uses shared settings for Road/Off Road modes and only changes speed limits between them. Is my understanding correct?
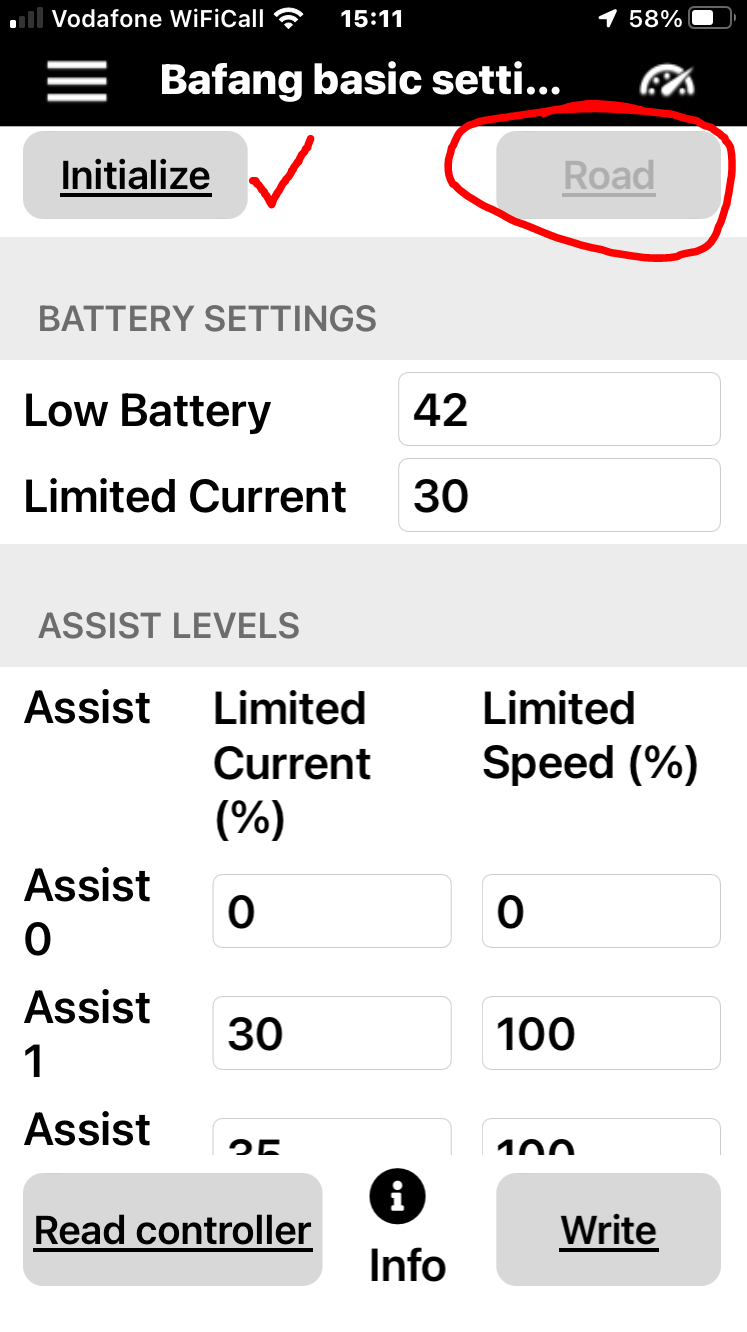
- Using this 'Only live data' approach, inside the Bafang settings I'm only seeing 'initialize' with the 'Road' option greyed out. I have initialized and it all seems to be working...so is this the road button unavailable because the settings are shared (because 'Only live data')?
- Lastly, has anybody bothered using the 'Live data and Settings' approach? I'm assuming this lets me mess with all the Bafang parameters in two places, Road/Off Road. Is that right?
Cheers


Neeko DeVinchi
E*POWAH Elite World Champion
- Thread starter
- #1,147
Apologies for the delay @BonBond.Hey @Neeko DeVinchi (and anybody else who has the Eggrider V2), I've just got myself an Eggrider and am looking at the setup, have a few questions:
Any help appreciated, I'm waiting to be let into the EggRider Facebook group, so coming here in the meantime...
- Are you guys using the basic 'Only live data' setting against the 'Bafang Switch' parameter?
- As I understand it, this method uses shared settings for Road/Off Road modes and only changes speed limits between them. Is my understanding correct?
- Using this 'Only live data' approach, inside the Bafang settings I'm only seeing 'initialize' with the 'Road' option greyed out. I have initialized and it all seems to be working...so is this the road button unavailable because the settings are shared (because 'Only live data')?
- Lastly, has anybody bothered using the 'Live data and Settings' approach? I'm assuming this lets me mess with all the Bafang parameters in two places, Road/Off Road. Is that right?
Cheers
View attachment 104070 View attachment 104069
1- No, I'm not. I've tweaked mine. I think the stock Eggrider sets road mode to 20mph. I've set it to 15.5mph. Offroad mode is a different story
2. The basic settings (1st page on the app), will only change rudimentary settings which will effect the performance of the motor generally. You need to set parameters per each level of assist, then fine tune the motors characteristics in 'advanced settings'. E.g. I've set my Eggrider to only give me three levels of assist per the road/offroad mode. In total, i have 6 levels of assist. The basic settings shows level 1-9. However, the levels of assist which need to be tweaked is 2, 3, 5, 6, 8 & 9. (2=level 1 Road, 3=level 1 offroad, 5=level 2 road, 6=level 2 offroad, 8=level 3 road & 9=level 3 offroad). By setting the power output per each level, you can determine how much power the M620 can achieve. Once those settings are saved, you can tweak the motor in advanced settings by manipulating how much pressure on the crank will provide motor power. You can also implement an over-run feature as well as.
3. The eggrider v2 doesn't 'technically' rewrite the parameters on bafang controllers. Moreso it recognises each parameter. And saves your desired settings within the display. However by initializing the eggrider to re-write the controller, you are permanently changing the controllers settings. E.g. if you remove the eggrider v2 display after initializing and use a 500c display or dpc18 display, the motor controller will remain as what the eggrider v2 programmed. By initializing the eggrider v2 display and swapping displays, the motor will revert back to its default settings (unless, they've been amended prior using the programming tool and cable or Besst tool.
Personally, I dont use Bafang's stock settings. So to me, it doesn't really bother me.
You can reach out to Eggrider on their community group on Facebook for all the newest updates
Log in to Facebook
Log in to Facebook to start sharing and connecting with your friends, family and people you know.
 www.facebook.com
Hope this helps
Mabman
E*POWAH Elite World Champion
As a display I have found that the 500c suits my needs but it does have its flaws. Sure it is small and hard to read, at least while riding. I don't refer to it much really other than to track voltage while stopped, which is off by - 1.5v btw, and once in awhile to make sure of my assist level and how fast I'm going on a ripping dh.
Of first importance to me was to get something on the +/- buttons that had a more tactile feel with gloves on. I dribble a lump of CA on them and that helped.
I didn't really consider how waterproof it was until I found out it wasn't. This is the second display I have drowned over the years and know better. Didn't really get all that wet really but wouldn't turn on the next day after being in a warm room overnight. I put it in a bag of rice and revived it enough so that it would at least power up and the +/- functioning but the screen was dead. It is inset slightly and It looks like water could sit there and get in behind the screen.
So I ordered another, they are only $50 and readily available luckily and I was able to ride at least while waiting for it to come. I modded the new one by gluing some cabinet bumpers to the +/- pads for an even more tactile feel and that worked just fine. I goobered around the screen and added a layer of clear 3M tape over it that lapped onto the display housing. We will see how it goes, the wet cycle is underway here where I live....
bram.biesiekierski
Active member
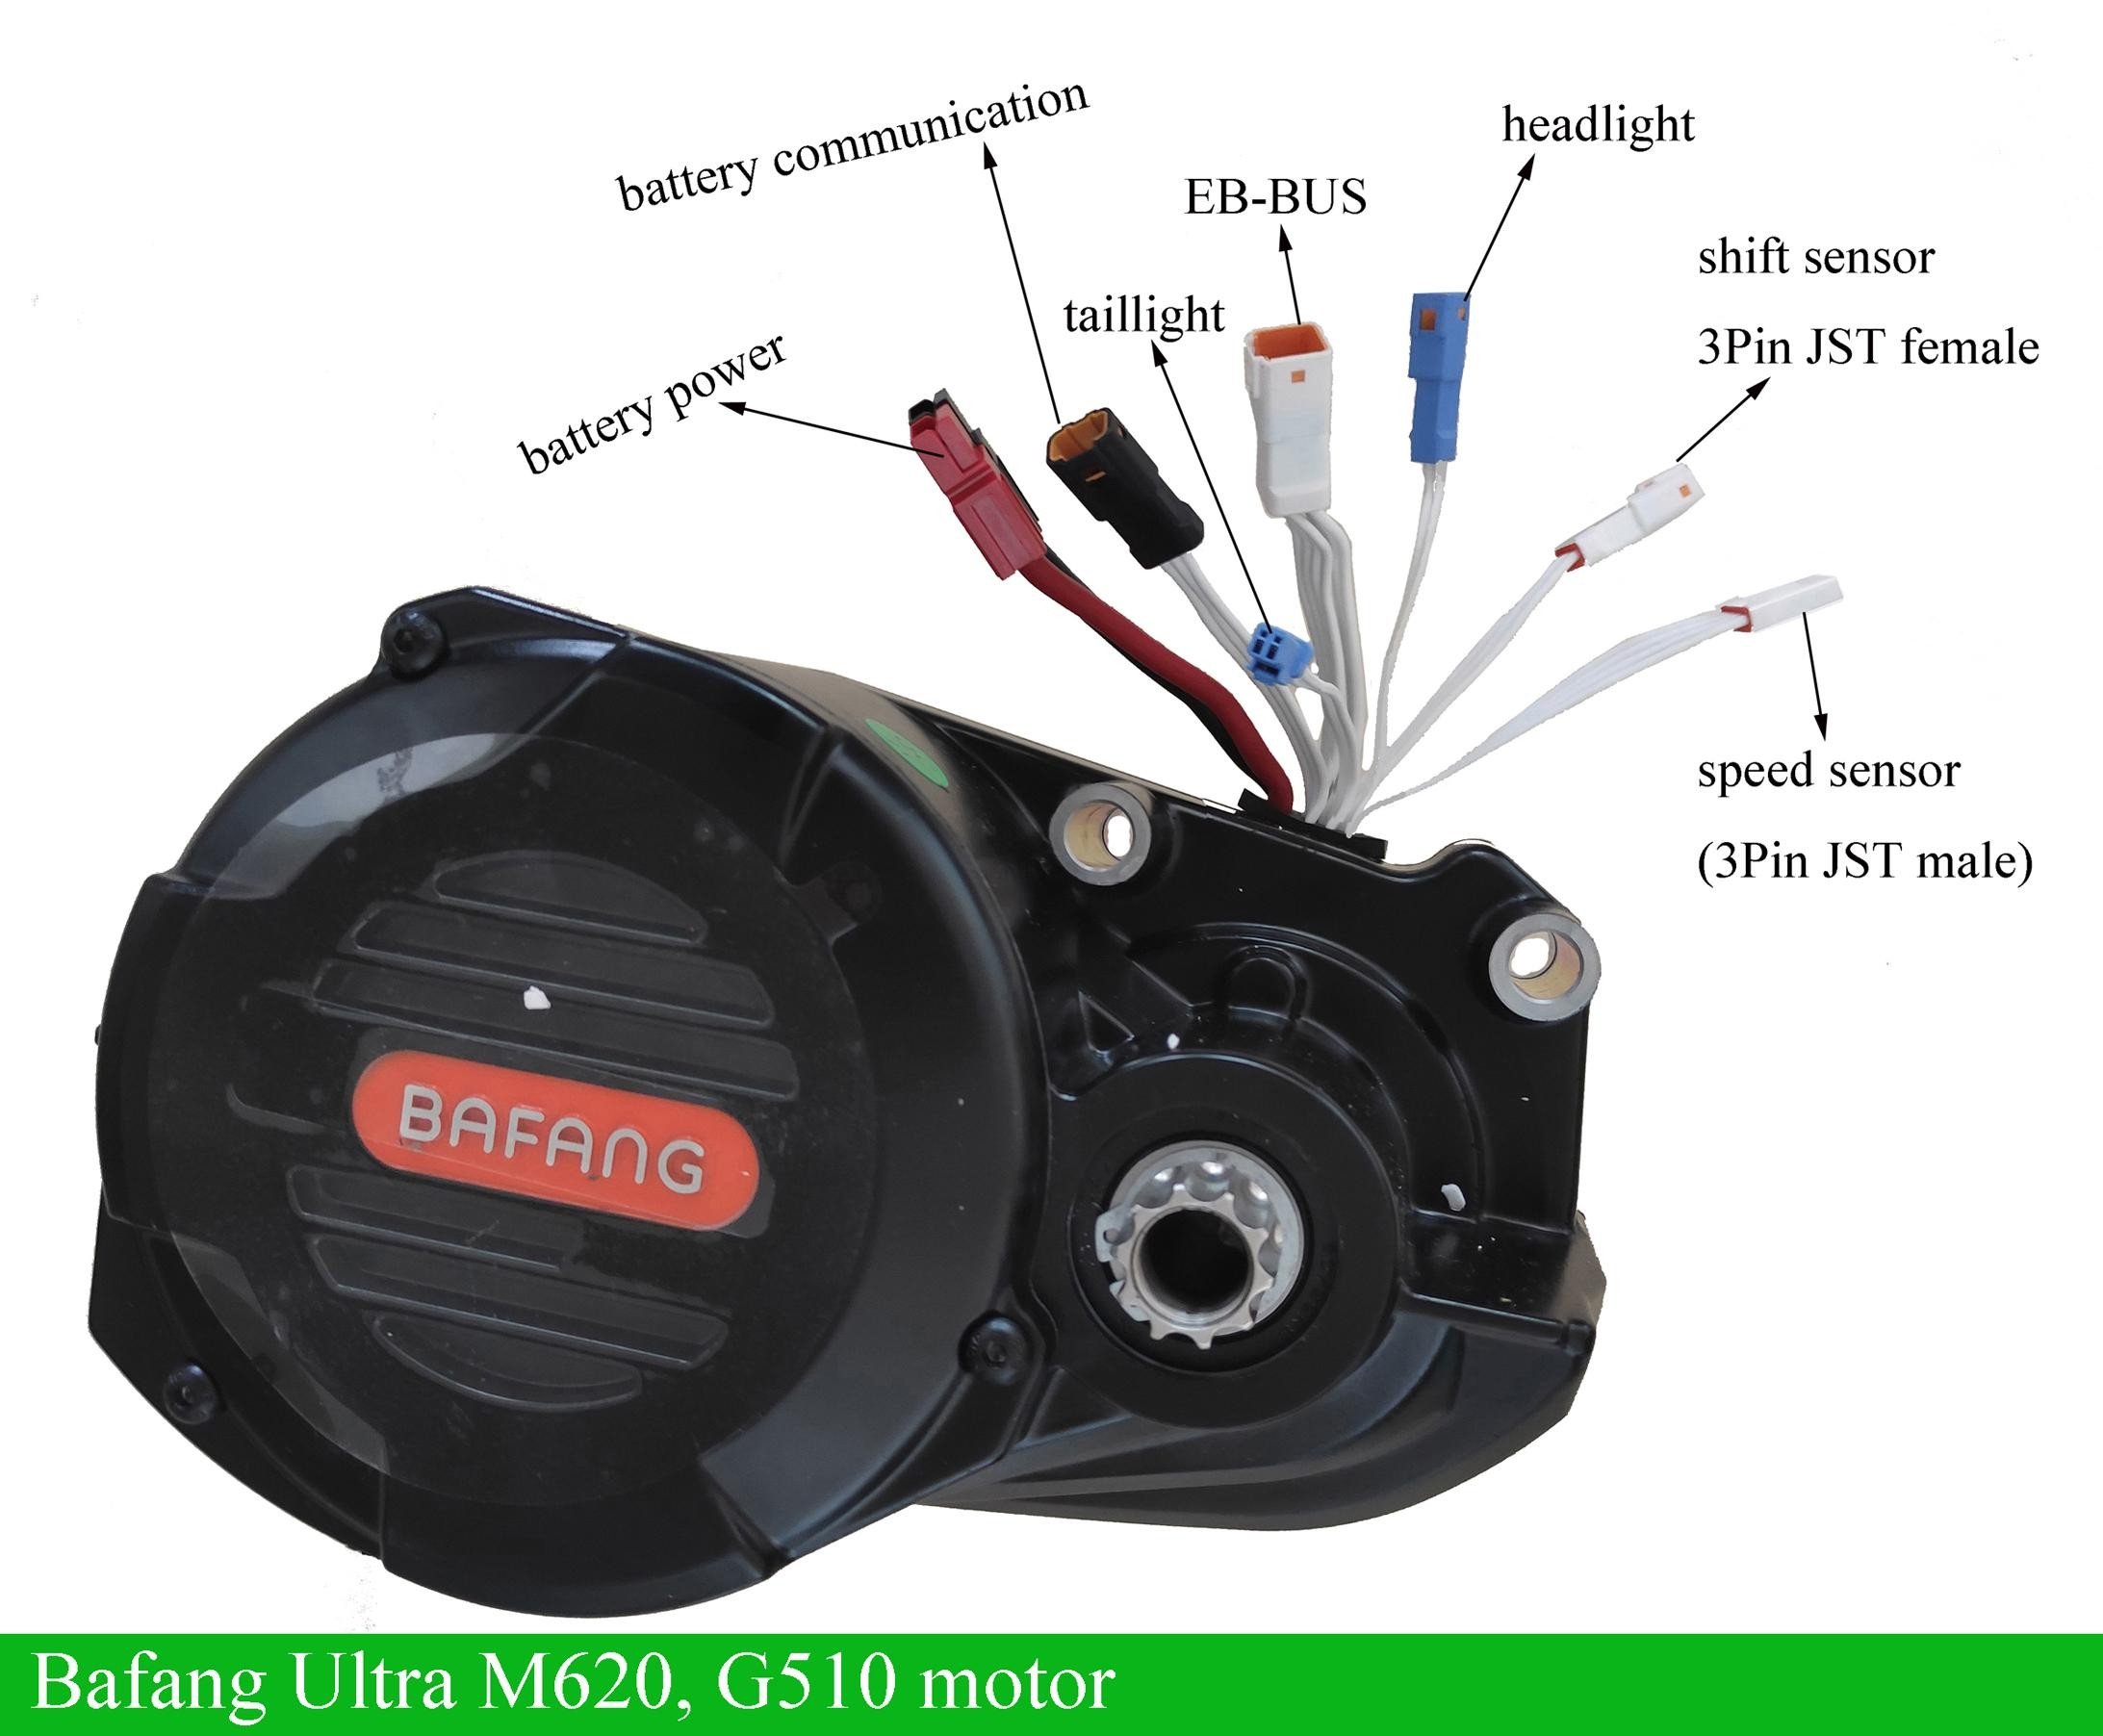
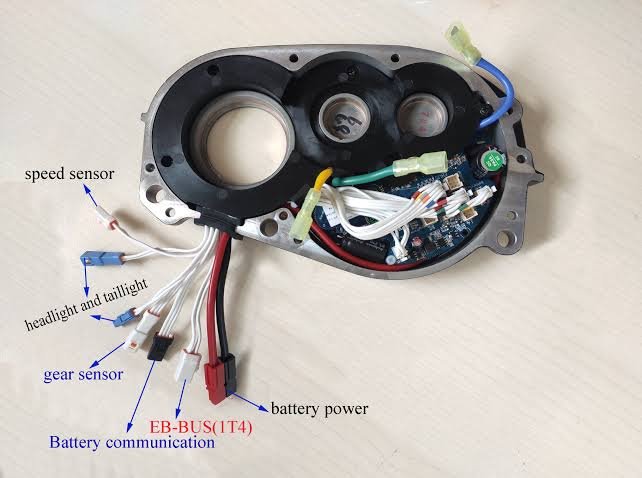
Can anyone tell me if there is a connector on the CAN m620 to accept brake / shift inputs. I want to wire up my Kindernay hydraulic shifter to cut power when upshifting. Because it's a hassle to wait for the motor to fully stop outputting during a shift.
bram.biesiekierski
Active member
These are the connectors I have.
There are no spare inputs in my wiring heading up to the display. But I have seen pictures of display wiring WITH brake cut switch inputs while browsing online. So im not sure what to do.
bram.biesiekierski
Active member
bram.biesiekierski
Active member
So. I've tested the 3 pin connector comming out of the motor. This is what I believe the wiring to be.
The wire I think is signal appears to be held high via a pull up resistor. So I suspect that if I close circuit between 0v and signal, it should tell the controller to cut power for a shift event.
Can anyone confirm before I attempt to wire it, and potentially blow something up.
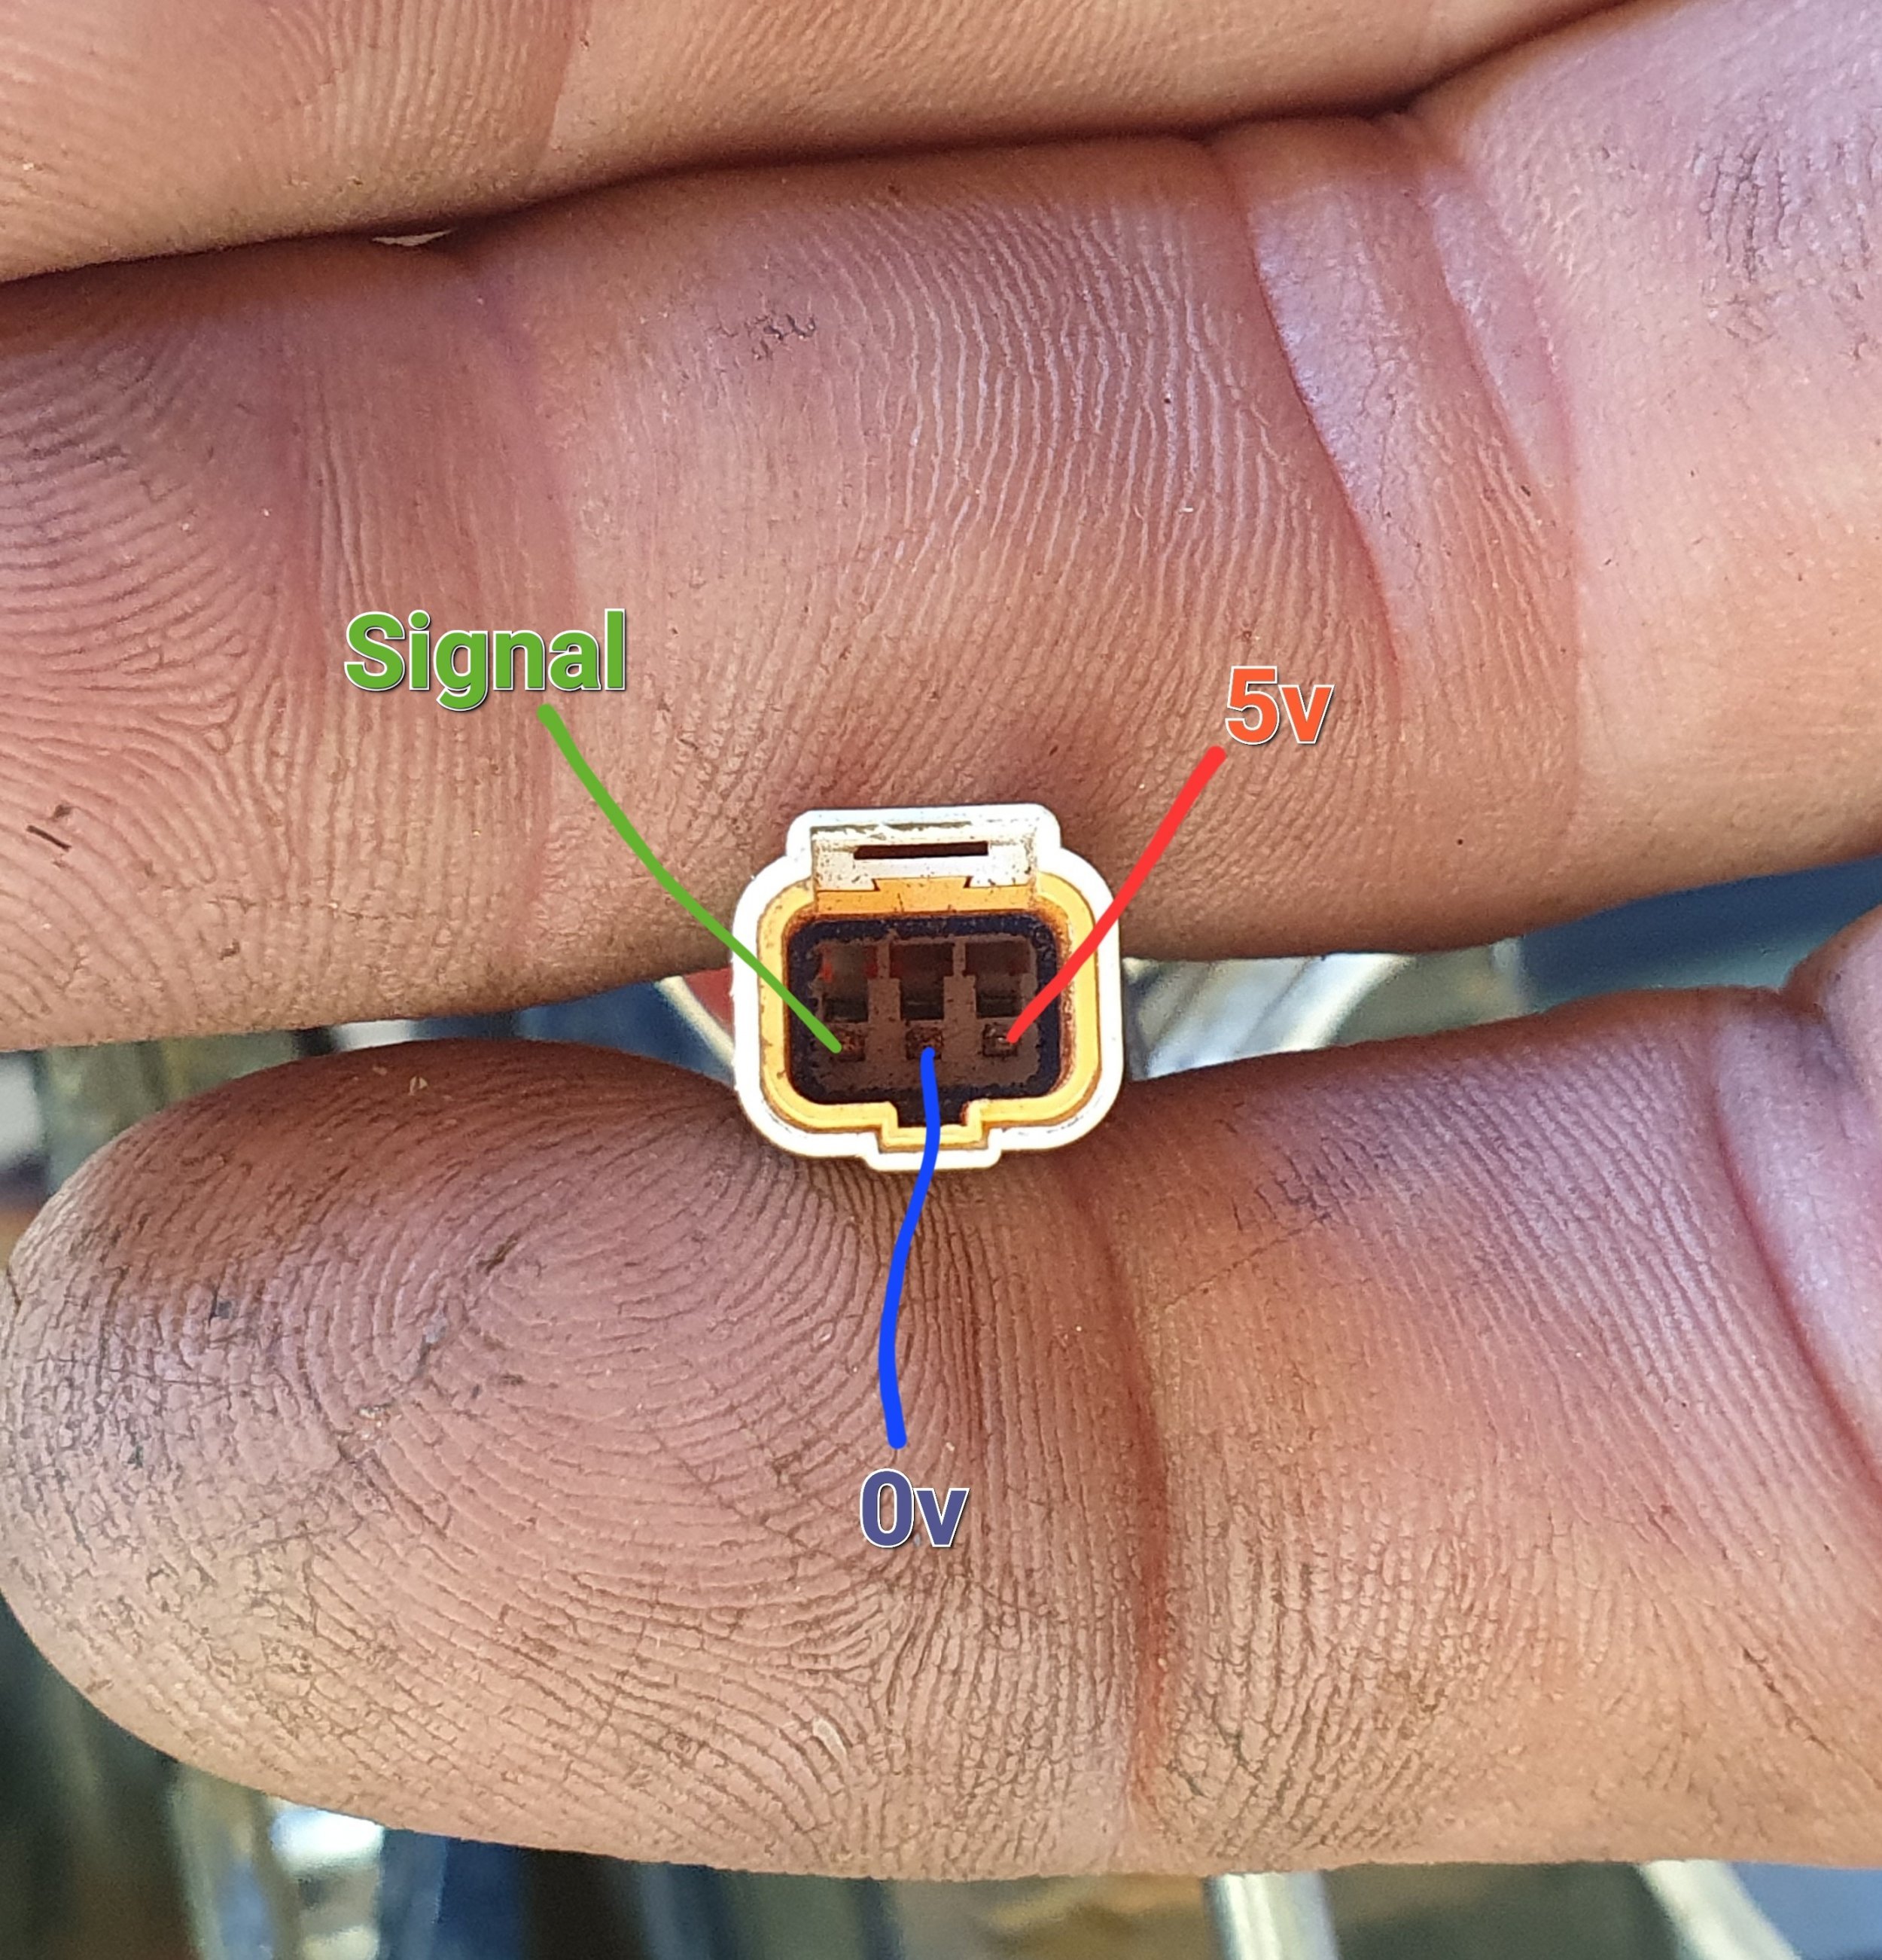
The wire I think is signal appears to be held high via a pull up resistor. So I suspect that if I close circuit between 0v and signal, it should tell the controller to cut power for a shift event.
Can anyone confirm before I attempt to wire it, and potentially blow something up.

I'm pretty sure it just comes off the main harness @bram.biesiekierski, it defo does on the UART model anyway and the sensors don't seem to be CAM/UART specific as far as I can see.
As a note, I wired the the power switch in the frame to an old brake sensor (as a sort of semi-kill-switch rather than full battery disconnect), the brake sensors only use two of those pins.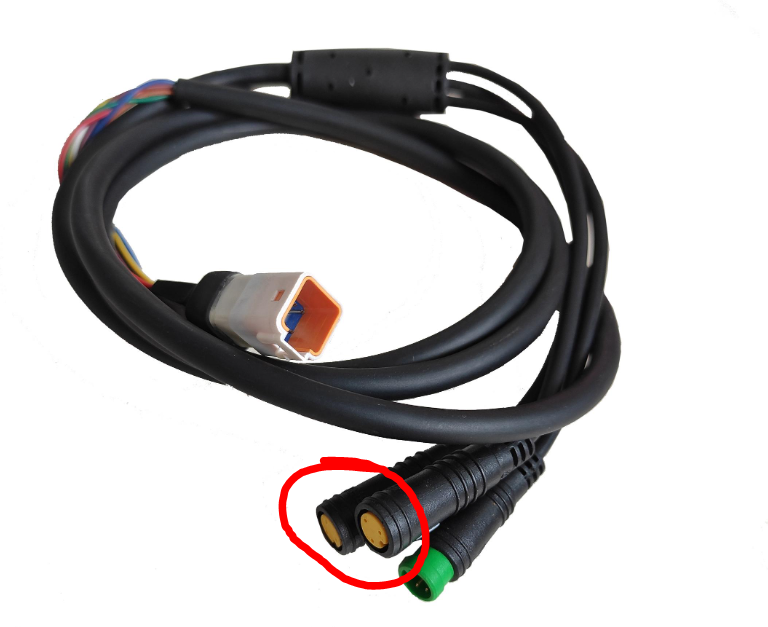 .
.
As a note, I wired the the power switch in the frame to an old brake sensor (as a sort of semi-kill-switch rather than full battery disconnect), the brake sensors only use two of those pins.
 .
.
Last edited:
Yeah, cheers @Mabman, the C500 is great display, that's what I've got on my BBSHD (and what I've used on all my builds BBSHD for friends and familyAs a display I have found that the 500c suits my needs but it does have its flaws. Sure it is small and hard to read, at least while riding. I don't refer to it much really other than to track voltage while stopped, which is off by - 1.5v btw, and once in awhile to make sure of my assist level and how fast I'm going on a ripping dh.
Of first importance to me was to get something on the +/- buttons that had a more tactile feel with gloves on. I dribble a lump of CA on them and that helped.
I didn't really consider how waterproof it was until I found out it wasn't. This is the second display I have drowned over the years and know better. Didn't really get all that wet really but wouldn't turn on the next day after being in a warm room overnight. I put it in a bag of rice and revived it enough so that it would at least power up and the +/- functioning but the screen was dead. It is inset slightly and It looks like water could sit there and get in behind the screen.
So I ordered another, they are only $50 and readily available luckily and I was able to ride at least while waiting for it to come. I modded the new one by gluing some cabinet bumpers to the +/- pads for an even more tactile feel and that worked just fine. I goobered around the screen and added a layer of clear 3M tape over it that lapped onto the display housing. We will see how it goes, the wet cycle is underway here where I live....
View attachment 104084
I wanted to give the Eggrider a whirl, partly for novelty, but mainly due to the ability to customise the all the Bafang settings over Bluetooth, in the field, without coming home to a PC and annoying USB cable. I tweaked the crap out of my BBSHDs.
First impressions of the Eggrider V2 are that its very cool, but the iOS App seems little way from perfect and interface is a bit compromised on my crappy iPhone. Maybe time for an upgrade there.
bram.biesiekierski
Active member
My m620 CAN system doesn't have those 2 yellow connectors. It only has the CAN display connector and throttle connector. But I have seen on GBK, that they list a harness that does have the brake inputs, which is supposed to be for CAN motors. So Bafang must make different option cables.I'm pretty sure it just comes off the main harness @bram.biesiekierski, it defo does on the UART model anyway and the sensors don't seem to be CAM/UART specific as far as I can see.
As a note, I wired the the power switch in the frame to an old brake sensor (as a sort of semi-kill-switch rather than full battery disconnect), the brake sensors only use two of those pins. View attachment 104107 .
See the pictures of the UART and CAN bus cables here.
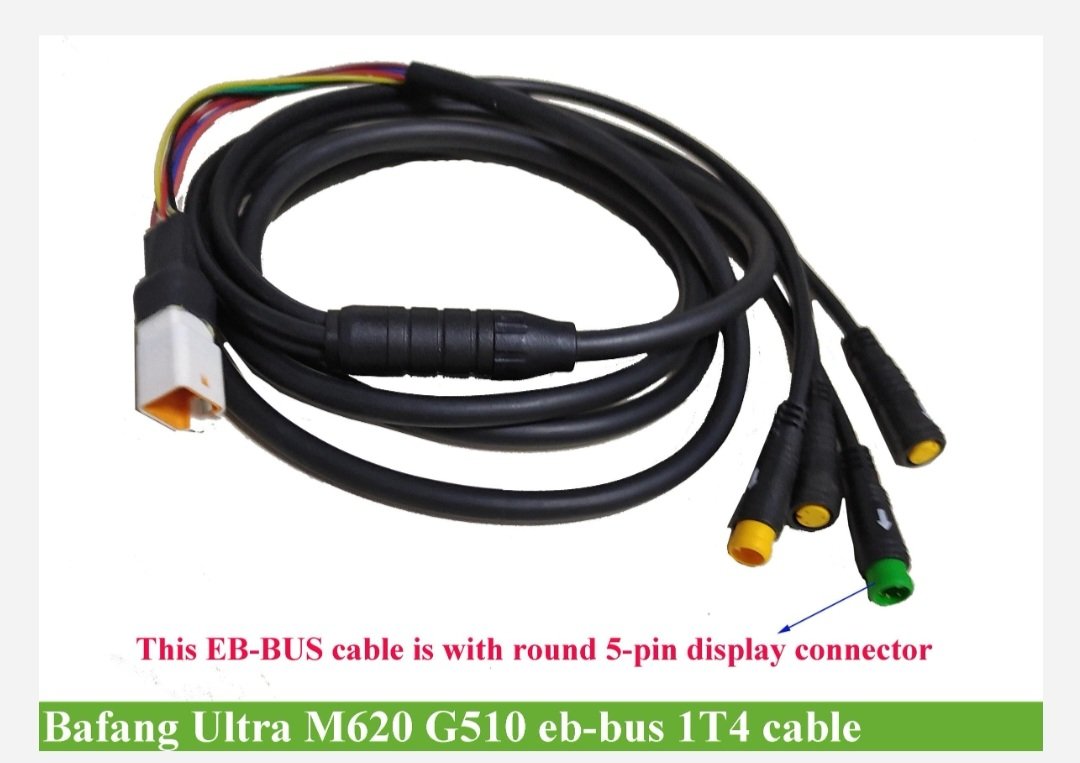
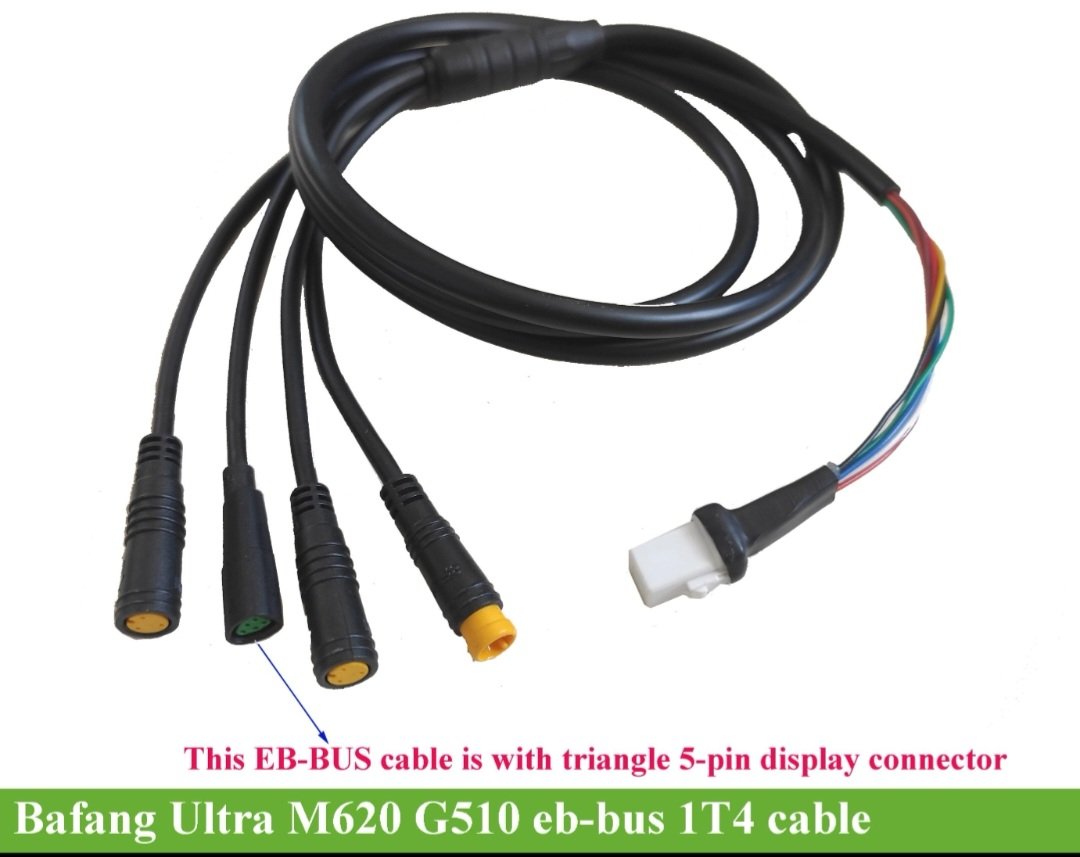
Thanks @Neeko DeVinchi. think we've gone down a bit of a rabbit hole here.Apologies for the delay @BonBond.
1- No, I'm not. I've tweaked mine. I think the stock Eggrider sets road mode to 20mph. I've set it to 15.5mph. Offroad mode is a different story. In addition, I've changed the wheel size and circumstance to get an accurate speedometer readout (although, you're not really looking at the display when you're riding).
2. The basic settings (1st page on the app), will only change rudimentary settings which will effect the performance of the motor generally. You need to set parameters per each level of assist, then fine tune the motors characteristics in 'advanced settings'. E.g. I've set my Eggrider to only give me three levels of assist per the road/offroad mode. In total, i have 6 levels of assist. The basic settings shows level 1-9. However, the levels of assist which need to be tweaked is 2, 3, 5, 6, 8 & 9. (2=level 1 Road, 3=level 1 offroad, 5=level 2 road, 6=level 2 offroad, 8=level 3 road & 9=level 3 offroad). By setting the power output per each level, you can determine how much power the M620 can achieve. Once those settings are saved, you can tweak the motor in advanced settings by manipulating how much pressure on the crank will provide motor power. You can also implement an over-run feature as well as.
3. The eggrider v2 doesn't 'technically' rewrite the parameters on bafang controllers. Moreso it recognises each parameter. And saves your desired settings within the display. However by initializing the eggrider to re-write the controller, you are permanently changing the controllers settings. E.g. if you remove the eggrider v2 display after initializing and use a 500c display or dpc18 display, the motor controller will remain as what the eggrider v2 programmed. By initializing the eggrider v2 display and swapping displays, the motor will revert back to its default settings (unless, they've been amended prior using the programming tool and cable or Besst tool.
Personally, I dont use Bafang's stock settings. So to me, it doesn't really bother me.
View attachment 104075 I'm asuming this is the prompt you get when you press initialize?
You can reach out to Eggrider on their community group on Facebook for all the newest updates
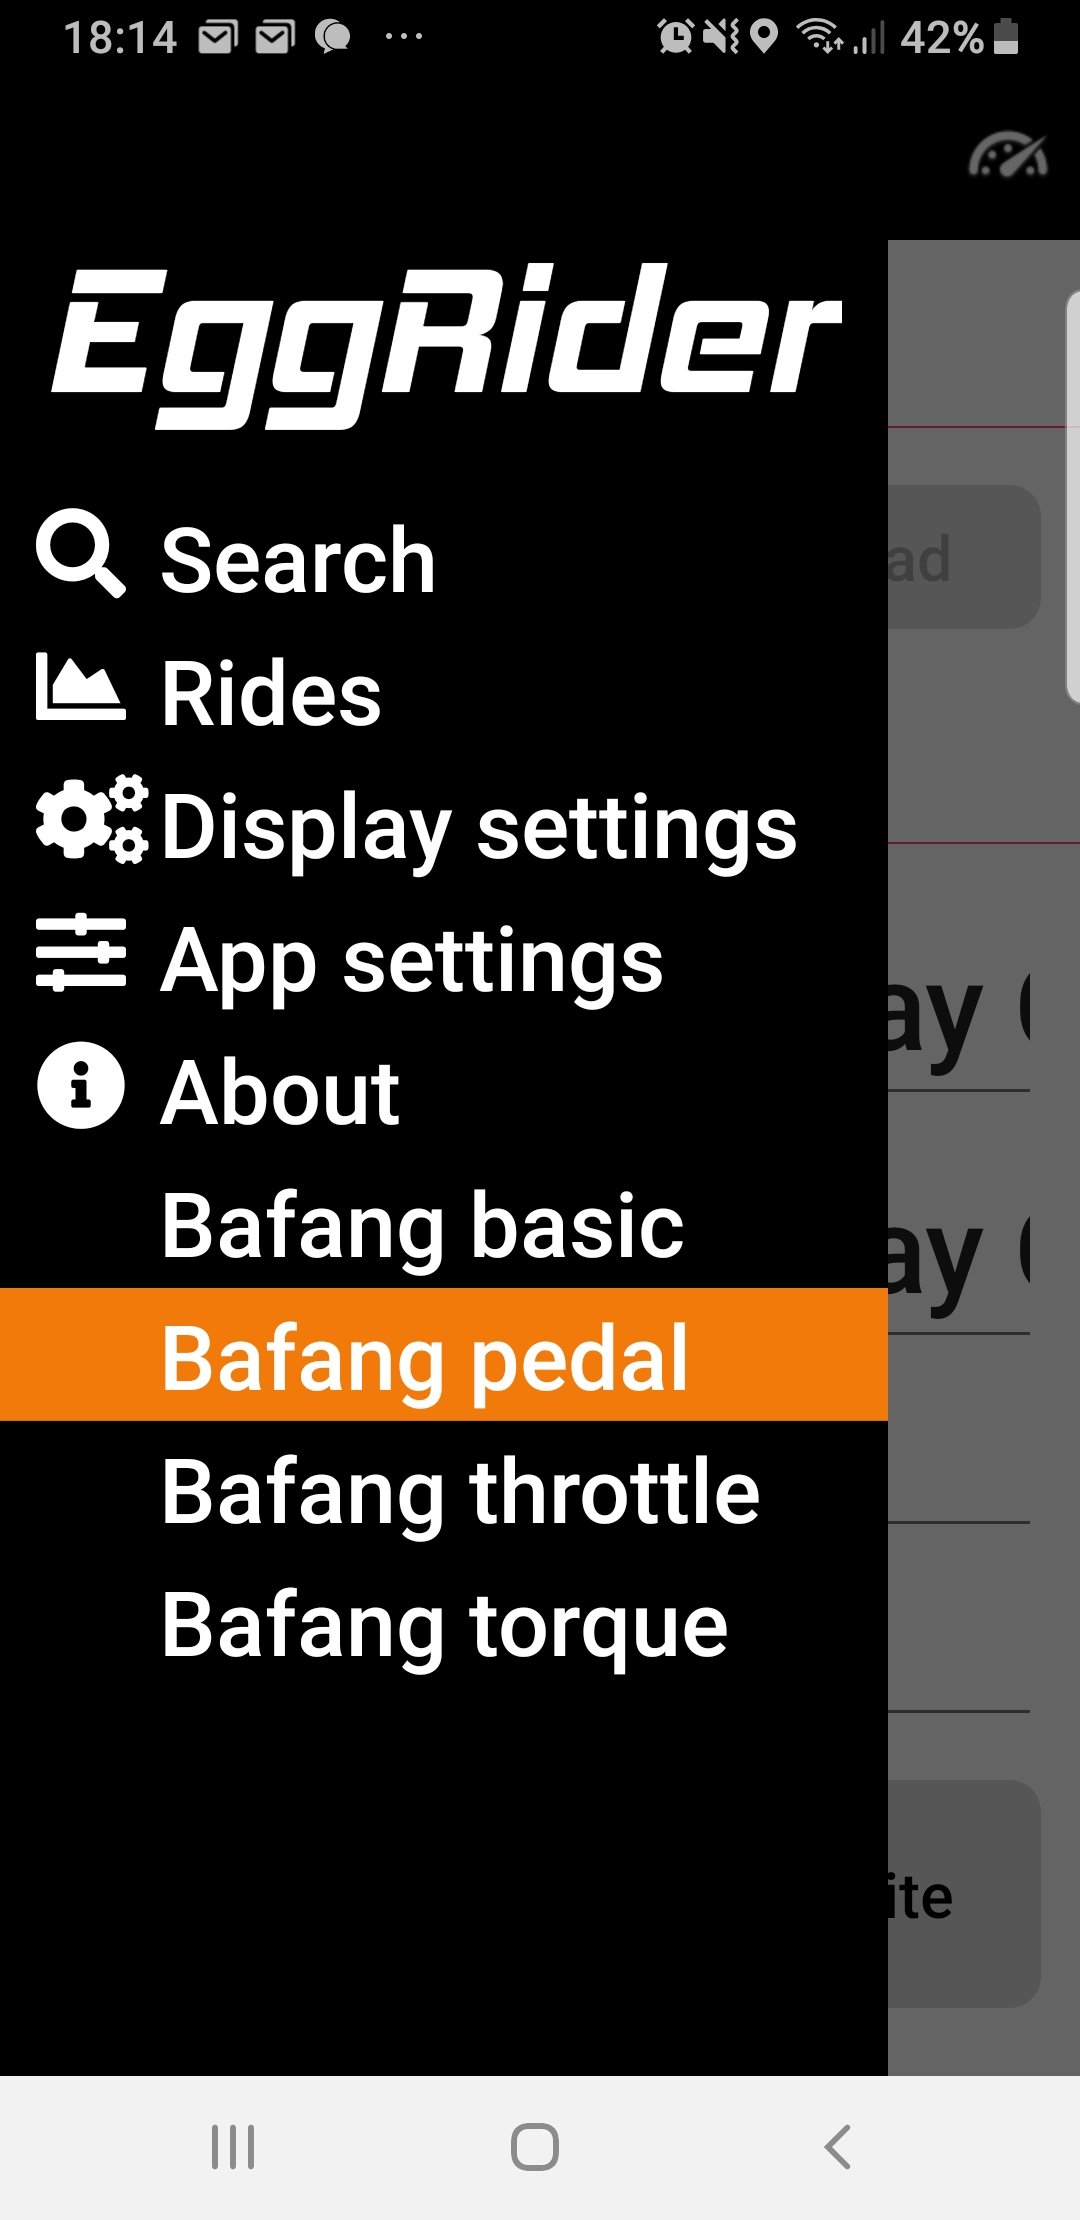
4. The parameters for the Bafang system are tweaked in all pages. Different pages do different things. Basic settings shows the power the motor will achieve. Throttle page determines throttle and walk mode. Pedal page determines the response time of the motor power. And torque page amends torque values in terms of how much force Is required, before the motor spins. View attachment 104074Log in to Facebook
Log in to Facebook to start sharing and connecting with your friends, family and people you know.www.facebook.com
Hope this helps
I'm very familiar with all of the Bafang settings, I've got loads of experience tweaking custom settings on BBSHDs, the only new area for me, Bafang wise, are the torque settings available on the M620. It's the Eggrider specific stuff that's new to me really...
So you are using 'live data and settings' not 'live data only' as the Bafang switch mode (in Display Settings)? In your previous Eggrider screenshots, inside the Bafang tabs, it looked like your road button is greyed out too - this confuses me as I'd assumed that popped to life with 'live data and settings'.
The Eggrider's USP (for me, aside from programming in the field), is that it provides access to two profiles, Road/Off-road. Is my core assumption correct that enabling the 'Live data and Settings' lets me mess with all the Bafang parameters in two profiles, and that 'live data only' merely restricts the speed in Road mode?
I've just been given access to the Facebook group, I'll go and have a poke around there too.
Ah... looks like you got a pared back cable then I guess. I don't know if this is helpful, but the yellow brake sensor connector I jury rigged to the latching switch used the blue and the black cables (connected to the red/black on the switch).My m620 CAN system doesn't have those 2 yellow connectors. It only has the CAN display connector and throttle connector. But I have seen on GBK, that they list a harness that does have the brake inputs, which is supposed to be for CAN motors. So Bafang must make different option cables.
See the pictures of the UART and CAN bus cables here.
View attachment 104108 View attachment 104109
bram.biesiekierski
Active member
I can confirm though that the shift cut input wiring is as I described above. (Pic below) Today I hooked in some Magura pressure switchs to the Kindernay up shift and down shift hydraulics. And also the rear brake hydraulics. I managed to fit all 3 pressure switchs in the space above the motor mounting area. I wired the switchs into the shift cut wiring connextor directly coming out of the motor. I used 0v and signal into the Magura pressure switchs, And left 5v disconnected.


I had to ofcourse rebleed the brakes and shift system. Which was a bit of a pain, first I bled it with the bike upright, but because the switchs are orientated with the T piece section up, I think they had air locks. So I turned the bike upside down, and rebled everything a second time. It seams to have got 99% of the air out. But I think maybe not perfect, I can still detect the slightest squishy feel to the rear brake.
It now shifts instantly as soon as you press the shift lever. No more sticking shifting like before. The pressure switch instantly requests a power cut from the motor, which seams to happen instantly aswell. This allows the shifter to select the next gear effortlessly.
The only problem is the motor power cut is quite long. The shifts happen very fast, but you are then left with maybe a second or so of dead time until the motor kicks back in after the shift has happened. It isn't that long, but it feels like an eternity when your riding fast and want to get back on it ASAP. But I guess this is better than before, where you would have to back off for like a second or two before the motor would unload enough to allow the shift to happen. Atleast this way, I can get the shift instantly, and the start pedalling again straight after the gear is engaged. So overall you loose less time off power, than before, and the shift happens when I want it to.
I did also inspect the kindernay bleed screws to see why they keep leaking. It looks like they have collapsed where the perpendicular passage way intersects the vertical passage way. I guess they have just made them too small to be strong. These things leaked from day 1. I tried tightening them up further and further in an attempt to get them to seal. And it seams this has crushed the end. So I will need replacements now.

And lastly, during the black Friday sales I grabbed another hope Tech3 / V4 brake kit. The Tech 3s are obsolete now because they have released Tech 4. So they were heavily discounted already, then the black Fridays discount made them an absolute bargain. They come with 3 sets of pads in each box. And I got the whole kit for about the same price as just getting the pads individually. So that allowed me to replace the rear brake calliper which was an E4 with the larger V4 calliper.

I had to ofcourse rebleed the brakes and shift system. Which was a bit of a pain, first I bled it with the bike upright, but because the switchs are orientated with the T piece section up, I think they had air locks. So I turned the bike upside down, and rebled everything a second time. It seams to have got 99% of the air out. But I think maybe not perfect, I can still detect the slightest squishy feel to the rear brake.
It now shifts instantly as soon as you press the shift lever. No more sticking shifting like before. The pressure switch instantly requests a power cut from the motor, which seams to happen instantly aswell. This allows the shifter to select the next gear effortlessly.
The only problem is the motor power cut is quite long. The shifts happen very fast, but you are then left with maybe a second or so of dead time until the motor kicks back in after the shift has happened. It isn't that long, but it feels like an eternity when your riding fast and want to get back on it ASAP. But I guess this is better than before, where you would have to back off for like a second or two before the motor would unload enough to allow the shift to happen. Atleast this way, I can get the shift instantly, and the start pedalling again straight after the gear is engaged. So overall you loose less time off power, than before, and the shift happens when I want it to.
I did also inspect the kindernay bleed screws to see why they keep leaking. It looks like they have collapsed where the perpendicular passage way intersects the vertical passage way. I guess they have just made them too small to be strong. These things leaked from day 1. I tried tightening them up further and further in an attempt to get them to seal. And it seams this has crushed the end. So I will need replacements now.
And lastly, during the black Friday sales I grabbed another hope Tech3 / V4 brake kit. The Tech 3s are obsolete now because they have released Tech 4. So they were heavily discounted already, then the black Fridays discount made them an absolute bargain. They come with 3 sets of pads in each box. And I got the whole kit for about the same price as just getting the pads individually. So that allowed me to replace the rear brake calliper which was an E4 with the larger V4 calliper.
Well, my E22 is 'finished', for now at least!
I just took it out on its maiden voyage and I'm utterly thrilled with it - its buttery smooth, the torque is insane and its incredibly comfortable. Quite the upgrade from my 52v BBSHD anyway...

Sincere thanks to everybody here who has helped me on the way, I mean that, you've all been super helpful.
I'll report back WRT the battery performance (I'm anticipating big gains there!), and will keep you posted with whatever I end up doing with the Bafang parameters. I'll probably share my complete build list for anybody who's interested too.
Hmmm...what do I upgrade first? Its that or a new project.
Cheers All.
I just took it out on its maiden voyage and I'm utterly thrilled with it - its buttery smooth, the torque is insane and its incredibly comfortable. Quite the upgrade from my 52v BBSHD anyway...
Sincere thanks to everybody here who has helped me on the way, I mean that, you've all been super helpful.
I'll report back WRT the battery performance (I'm anticipating big gains there!), and will keep you posted with whatever I end up doing with the Bafang parameters. I'll probably share my complete build list for anybody who's interested too.
Hmmm...what do I upgrade first? Its that or a new project.
Cheers All.
What is the purpouse of that little button beside the keyhole? I connected all the cables , but this button has no effect, it should probably be on/off switch?do something cool with the keyhole if you have any room behind there!
bram.biesiekierski
Active member
It's for the on/off switch to power up the battery BMS. My original battery needed it to be on to work. My second battery from DT worked regardless of the switch.What is the purpouse of that little button beside the keyhole? I connected all the cables , but this button has no effect, it should probably be on/off switch?
After a few months, something went wrong with that circuit. I could no longer ride with the original battery. It was erratic and the bike kept shitting down. I opened up the battery thinking it was an issue inside the battery, since my other battery was unaffected. Inside I found the BMS had that circuit connected up to the contacts in the battery mount block and switch.
I linked the connection to power up the BMS inside the battery, bypassing the switch and circuit. And it has been good since then. I believe others have had problems with the switch aswell. So I put it down to being a faulty switch. But I never actually tested it etc. Just bypassed.
It's probably an important safety item. But if it doesn't work, then it's getting bypassed LOL
yeah, the guy who built my battery pretty much refused to fit a BMS with switch - told me they're not reliable and just something else to break. I didn't want a completely redundant switch on my frame, so wired it up as a brake sensor - got myself a half-baked kill switchIt's for the on/off switch to power up the battery BMS. My original battery needed it to be on to work. My second battery from DT worked regardless of the switch.
After a few months, something went wrong with that circuit. I could no longer ride with the original battery. It was erratic and the bike kept shitting down. I opened up the battery thinking it was an issue inside the battery, since my other battery was unaffected. Inside I found the BMS had that circuit connected up to the contacts in the battery mount block and switch.
I linked the connection to power up the BMS inside the battery, bypassing the switch and circuit. And it has been good since then. I believe others have had problems with the switch aswell. So I put it down to being a faulty switch. But I never actually tested it etc. Just bypassed.
It's probably an important safety item. But if it doesn't work, then it's getting bypassed LOL
Nice looking build! Been following the battery progress you posted in here so its awesome to see the bike all completed now! As for upgrades I don't think you can go wrong with that innotrace controller.... More power or at least more efficiency sounds like something I would be afterWell, my E22 is 'finished', for now at least!
I just took it out on its maiden voyage and I'm utterly thrilled with it - its buttery smooth, the torque is insane and its incredibly comfortable. Quite the upgrade from my 52v BBSHD anyway...
View attachment 104138
Sincere thanks to everybody here who has helped me on the way, I mean that, you've all been super helpful.
I'll report back WRT the battery performance (I'm anticipating big gains there!), and will keep you posted with whatever I end up doing with the Bafang parameters. I'll probably share my complete build list for anybody who's interested too.
Hmmm...what do I upgrade first? Its that or a new project.
Cheers All.
bram.biesiekierski
Active member
Well it seams I now have the dreaded error 21. The problem comes and goes. I might have distrurbed the wiring when i installed the shift cut switchs.
I'm not sure what's the problem, but it's intermittent. So I don't think it's a hard fault with the recent shift cut instal. But perhaps the wiring or plug has been pulled/disturbed etc. I've ordered a new speed sensor already, just incase it is that.
When I get more time, I will pull the motor again and inspect / test everything. I did pull the small cover off the top of the motor trail side, and fished out the wiring for the speed sensor. I tried unplugging/ wiggling the wiring, and it came good, but kept faulty after a few KMs. I also tried reposistioning the magnet and pickup. But I dont think it was that, as nothing changed in that area. The fault made riding unbearable. I was out in the valley here in Kalamunda. Which is very steep and gnarly DH trails and savage climbs back up. There was no way I could carry on without the motor functioning.
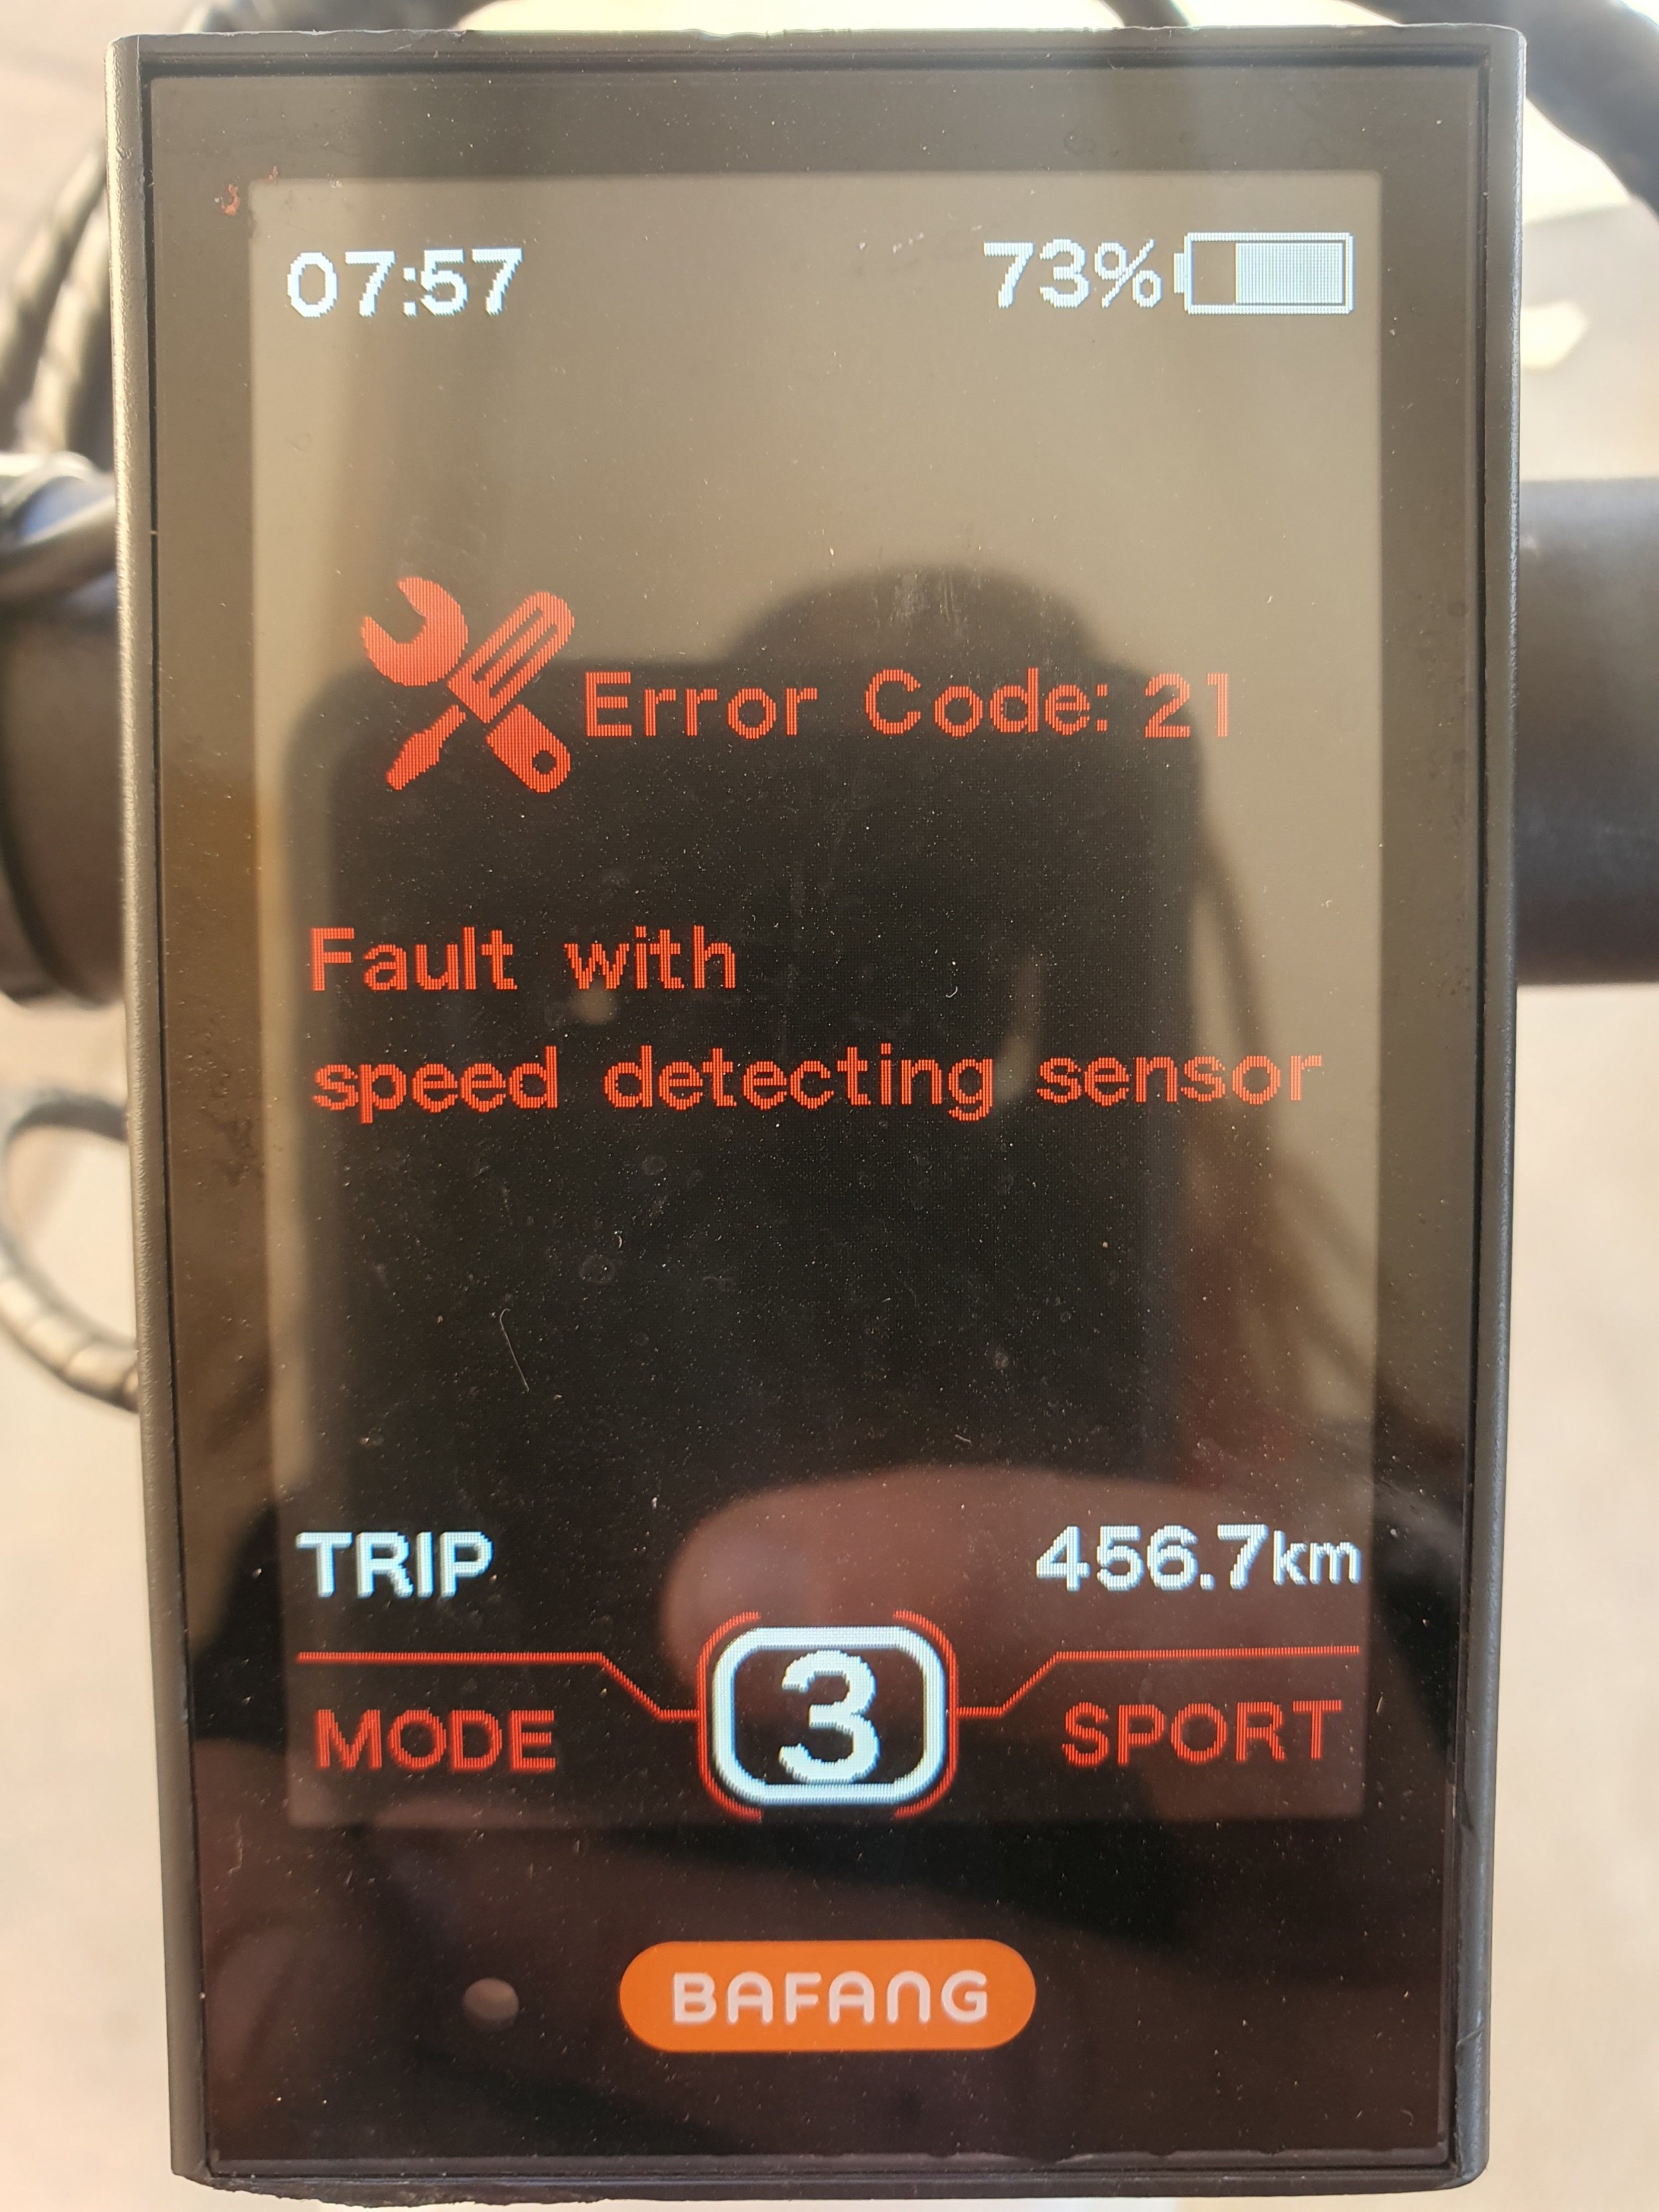

bram.biesiekierski
Active member
Talking about the key hole, what are you using to cover? Did you design your own plug?do something cool with the keyhole if you have any room behind there!
Are these 21700 or 18650 you are talking about?I ride at the moment a Innotrace x1 3000w Controller with 14s8p 60A accu.
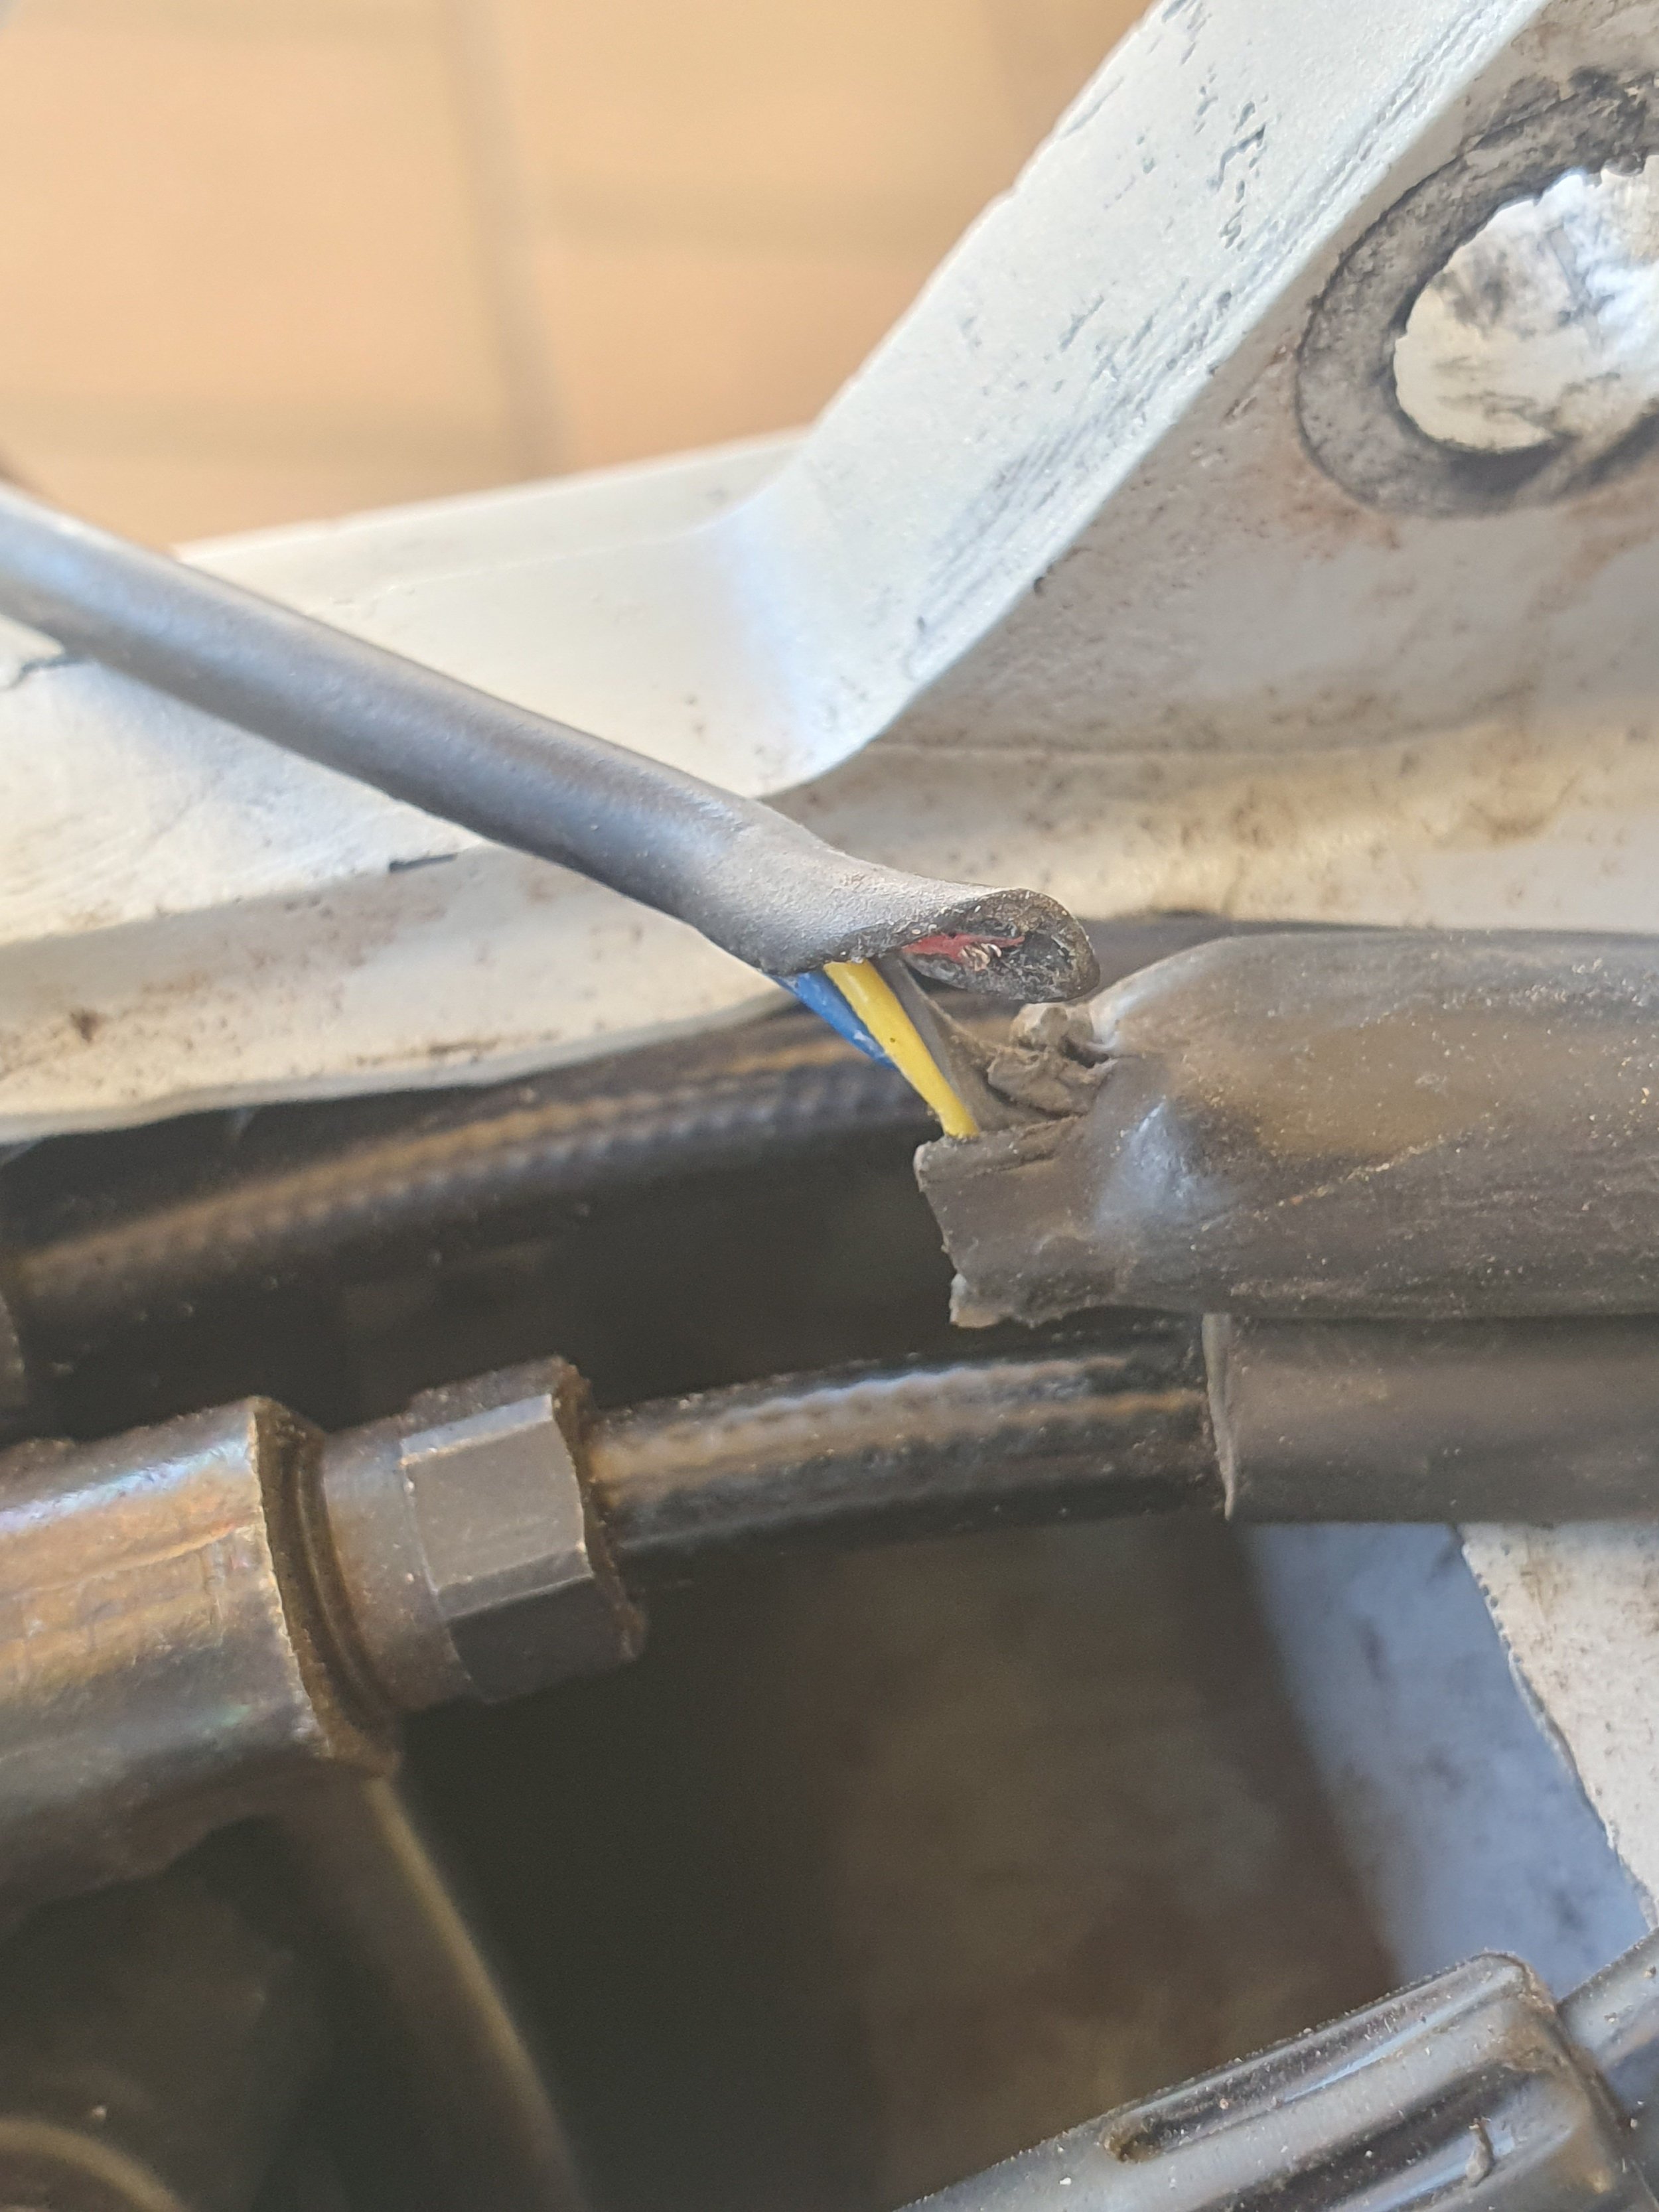
Ouch, that smarts. At least its an easy fix.Found my problem. Lol
Ham fisted bike mechanic strikes again. This is why I work on HD construction machinery. Those machines just tolerate abuse so much better than eMTBs HAHA
View attachment 104180
It's just a shop bought 25mm blind grommet, it cost me pence. Something like this.Talking about the key hole, what are you using to cover? Did you design your own plug?
Fits perfectly (I had to trim the back of it a bit), I 'glued' it in place with liquid tape too, for belt and braces/over-thinking.
Side note - Liquid tape is f******g amazing stuff, I used it to waterproof quite a lot of stuff on my build. I'd seen ppl talking about ingress around the power switch for example - that ain't happening on my build
Similar threads
EMTB Forums
Since 2018
Join Our Community
The World's largest electric mountain bike community.
- 571K
- Messages
- 29,037
- Members
Latest articles
-
The new Whyte Kado – an existing design with a new price?
Don’t get me wrong, the Kado isn’t an old bike. It’s a brand-new model...- Knut Nes
- 2 min read
- Views: 2K
- Reaction score: 2
- Comments: 4
-
Pinion Motor Gearbox: What’s It Really Like?
Introduction The Nicolai S16 is a long-travel enduro eMTB that...- Rob Rides EMTB
- 5 min read
- Views: 4K
- Reaction score: 16
- Comments: 10
