Bb49er

Member
Nov 17, 2018
10
8
Suffolk
Hi . Had same with mine . When I clocked the huge holes in the box , I was just a bit gutted !
Luckily just the steerer cap marked . No other marks . Plastic pedal did snap first time out .
Vitus thicker cardboard , bubblewrap etc and you be golden ( or green ).
Wiggle been great though View attachment 8908 View attachment 8904 View attachment 8904 View attachment 8905 View attachment 8906 View attachment 8907 View attachment 8908 , sending nukeproof cap replacement and aluminium pedals .
Brilliant bike , luv the looks .
Do like a bit of green !
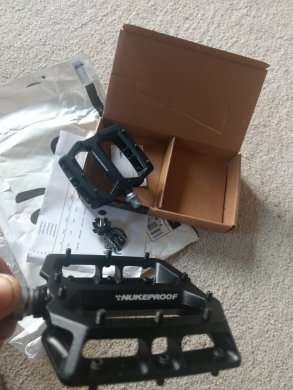
Wiggle sent these . Not up with which are the good makes , but seem strong and well made have a large area for my feet . Off to put them on and a ride will tell . IMG_20181220_092938445.jpg
 

Master Link

Member
Dec 7, 2018
161
63
Isle of Wight
For Reference the Bearings are:

Sealed cartridge bearing – 6800 – 2RS x 4
Sealed cartridge bearing – 6901 – 2RS x 4
Sealed cartridge bearing – 6902 – 2RS x 2

Attached PDF Has The Torque Values.
All main Pivot bolts and shock Bolts are 15Nm
The Horst Link ( Seat Stay : Chain Stay.. the small ones near Derailleur) are 6Nm.
Check the attached PDF to confirm for yourself though.

Thanks To Vitus Tech Support for the info.
Big (y) for the info. My 2016 Giant Reign used the same bearings, so easy to source.
 

Letitrip

Member
Dec 18, 2018
7
13
Staffordshire
Well. I’ve been out today for the second time and what a piece of kit this bike is.bike handles great forks and shock are very good. Didn’t expect the rear to be that good as I normally ride a coil shock but it handled everything. I was a little apprehensive about the battery weight and how it would handle in the air and on the landings. It is a little bit different but I’ll get used to it.torque sensor has been fine not a bleep from it. Can’t fault the tyres. I’m really glad I bought this bike it’s a beast of a bike .happy days ?
 

Master Link

Member
Dec 7, 2018
161
63
Isle of Wight
I tried to get one at Wiggle. I had it in my basket but when I checked out it was not there. In the course of trying to sort it out with Customer Support both bikes were sold. I am very *(%+-!. Off?
 

Polaris

Active member
Oct 15, 2018
388
262
Lancashire, England
I tried to get one at Wiggle. I had it in my basket but when I checked out it was not there. In the course of trying to sort it out with Customer Support both bikes were sold. I am very *(%+-!. Off?
Man that’s bad luck, I take it they are getting more but it sounds like they are only coming in drips and drabs now. Talk about demand outstripping supply!
 

Tony P

New Member
Dec 15, 2018
26
13
South West
First proper ride today at FoD and have to say that I’m impressed.... still need to dial in the suspension, tyre pressures and cockpit but so far so good

3 things -

1 - upon receipt, check that your cassette is torqued correctly. Mine wasn’t and last week I managed to rip off the end of the free-hub whilst on its test ride up and down the road. Fair play to Wiggle though as they provided a replacement wheel as no spare freehubs are available

2- on 3 or 4 occasions it turned itself off on some rocky, techy descents with some jumps. Was ok when I turned it back on (first time got the WO13 error but think it may have been my foot being on the pedal) but not sure why it was happening as battery and connections to controller seem ok. Any ideas?

3 - close to the final descent the bars on the controller went from 2 to 1 red however the battery was still showing 2 bars. Turned it off and back on again and both the controller and battery showed 2 bars. Any ideas re the disparity between the battery and controller?

Happy riding ?
 

Master Link

Member
Dec 7, 2018
161
63
Isle of Wight
The reason I was ordering from Wiggle was to get my 12% discount. Wiggle sort of acknowledged that they had a problem with how this bike was listed on their website. Interestingly, it would have let me buy it if I lived anywhere other than the UK. Let's hope the next batch is listed correctly.
 

R120

Moderator
Subscriber
Apr 13, 2018
7,819
9,190
Surrey
First proper ride today at FoD and have to say that I’m impressed.... still need to dial in the suspension, tyre pressures and cockpit but so far so good

3 things -

1 - upon receipt, check that your cassette is torqued correctly. Mine wasn’t and last week I managed to rip off the end of the free-hub whilst on its test ride up and down the road. Fair play to Wiggle though as they provided a replacement wheel as no spare freehubs are available

2- on 3 or 4 occasions it turned itself off on some rocky, techy descents with some jumps. Was ok when I turned it back on (first time got the WO13 error but think it may have been my foot being on the pedal) but not sure why it was happening as battery and connections to controller seem ok. Any ideas?

3 - close to the final descent the bars on the controller went from 2 to 1 red however the battery was still showing 2 bars. Turned it off and back on again and both the controller and battery showed 2 bars. Any ideas re the disparity between the battery and controller?

Happy riding ?

1. Yup you have to give the bike a once over on delivery as it appears they are being rushed out at the moment.

2. Check the battery holder, the parts that hold the battery are adjustable (have a feeling it may only be the bottom one but might be both ends), to make sure there is a tight fit - if the battery is slightly loose, or one of the connector loose, this would cause bike to turn off.

You can check the cable connections by popping off the motor cover on the LHS.

The bottom battery holder, which has the electrical connection, is designed to have some side to side movement, so don't think this isn't normal - its to help get the battery in.


3. Yes this is fairly common - the head unit is calculating your range/battery remaining off how you are riding at the time, so if you are caning it, it will predict less range etc, whereas the battery indicator seems to be more linear. As you have noted the display can show one bar, and the battery two, but if you switch off then turn on again the display will go back up to two. This is because you have effectively reset its memory of how you are riding, and commenced a new ride.
 

R120

Moderator
Subscriber
Apr 13, 2018
7,819
9,190
Surrey
This is the installation manual, which has relevant info on connections and set up of the steps sytem
 

Attachments

  • DM-E8000-04-ENG.pdf
    2.7 MB · Views: 582

Tony P

New Member
Dec 15, 2018
26
13
South West
1. Yup you have to give the bike a once over on delivery as it appears they are being rushed out at the moment.

2. Check the battery holder, the parts that hold the battery are adjustable (have a feeling it may only be the bottom one but might be both ends), to make sure there is a tight fit - if the battery is slightly loose, or one of the connector loose, this would cause bike to turn off.

You can check the cable connections by popping off the motor cover on the LHS.

The bottom battery holder, which has the electrical connection, is designed to have some side to side movement, so don't think this isn't normal - its to help get the battery in.


3. Yes this is fairly common - the head unit is calculating your range/battery remaining off how you are riding at the time, so if you are caning it, it will predict less range etc, whereas the battery indicator seems to be more linear. As you have noted the display can show one bar, and the battery two, but if you switch off then turn on again the display will go back up to two. This is because you have effectively reset its memory of how you are riding, and commenced a new ride.
Thanks @R120 for taking the time to respond- much appreciated ?
 

davosaurusrex

E*POWAH Master
Apr 21, 2018
619
369
Worthing
Might be somewhere else in this thread but what pressures/sag is everyone running in the rear shock and what's your kitted up weight? Just adjusted mine to 230psi for 25% sag at 90kg-ish kitted
 

davosaurusrex

E*POWAH Master
Apr 21, 2018
619
369
Worthing
That's exactly what I was running but really felt like it was dragging it's arse round Surrey Hills last week, smacked the rear pedal a few times with level cranks on not particularly lumpy trails
 

R120

Moderator
Subscriber
Apr 13, 2018
7,819
9,190
Surrey
Yeah its funny you should post up your query as I started playing around with the rear pressure this week having pretty much not touched it for 6 months.

I think when I originally set it up I was at about 215 psi which I have been happy with, but noticed recently that I was blowing through the travel more, and when I checked the sag it had gone to about 35%.

Rather than going back to original pressure (I think with temp changes and the fact I have mostly been using my hardtail meant the pressure had dropped off a bit) I decided to re set sag at 30% to see how it felt.

Plan is to try 25% on next ride, 30% feels ok but definitely feel more aware of the shock moving about off the pedal stroke, nice ride over gravel/fire roads though!
 

steve_sordy

Wedding Crasher
Nov 5, 2018
9,144
9,635
Lincolnshire, UK
..................

Plan is to try 25% on next ride, 30% feels ok but definitely feel more aware of the shock moving about off the pedal stroke, nice ride over gravel/fire roads though!

On a new bike, I start off with a pre-determined sag%, but only as a guide. Then once I've taken it for a ride it for I let air out or added it according to how the bike felt. I started doing that when I had a bike with a sticky fork and could not get a repeatable measurement. I never had a sticky shock, probably due to the higher pressure. Only when I was happy after a few rides did I bother to work out what the sag% was for fork & shock. (My current clockwork bike is about 28% sag). But once I'd got pressures I was happy with, I wrote them on the garage wall. Similar with rebound and compression, although I tend to vary compression damping during the ride more than I change the rebound damping.
 

R120

Moderator
Subscriber
Apr 13, 2018
7,819
9,190
Surrey
Yeah I usually just set it at 30%, go out for my usually loop and pump it up/down till I am happy and leave it at that, but thought I would try a more scientific approach for one
 

steve_sordy

Wedding Crasher
Nov 5, 2018
9,144
9,635
Lincolnshire, UK
Yeah I usually just set it at 30%, go out for my usually loop and pump it up/down till I am happy and leave it at that, but thought I would try a more scientific approach for one
Nothing wrong with that approach, just record the pressure so that you can repeat it. It also allows you to check the pressure before you ride after the bike has been hanging about for a while. I do the same with tyre pressures in that I have an idea of what it should be, but then go from how it feels. Once I have something I like I note it down and check before every ride.
 

Gary

Old Tartan Bollocks
Author
Subscriber
Mar 29, 2018
10,496
10,705
the internet
Might be somewhere else in this thread but what pressures/sag is everyone running in the rear shock and what's your kitted up weight? Just adjusted mine to 230psi for 25% sag at 90kg-ish kitted


205psi
27% sag - only of any actual use to anyone if they measure their sag in exactly the same standing position as I do
95kg

I guess you might be measuring sag seated? If so you're not sitting down when you get these... er... what are they called again?... um... pedal strikes? are you? ;)

Pay attention and dip your front crank arm on approaching whatever you're hitting with your rear pedal.

Sensei say
Be ninja NOT sloth

3f78f9eec09a2495516297ac4a8a3b0a.jpg
 
Last edited:

davosaurusrex

E*POWAH Master
Apr 21, 2018
619
369
Worthing
Sag was measured standing @Gary. To be honest I was just after a general feel for other's setup rather than Garytastic advice on what works for ME might not work for YOU, poppy/jumpy/playful, short reach, clown cranks, Confessions of a Window Cleaner, blahblah infinity etc. Thanks for the tips though! ;)

Anyhoo, rode the local trails today with the 230psi up from 200, also 140psi in the forks and the one token removed which gave 25% sag both ends. The difference was remarkable - Used all but last couple of mm of travel on the shock stanchion, still had 30mm of stanchion showing on the forks so have reduced that 10psi. Might knock another 5-10 out of the rear shock but there's nothing too big or gnarly round here so might not. Either way the bike was so much more composed and easy to ride, felt like I had a 10% speed boost. Had a great ride! Really should pay more attention to this shit. Doh!
 

Gary

Old Tartan Bollocks
Author
Subscriber
Mar 29, 2018
10,496
10,705
the internet
also 140psi in the forks
Dafuq?

From reading folks settings online there must be some sort of massive inconsistency in lyrik pressures.
I'm running 85psi zero tokens and almost NEVER bottom mine
Sag is about 23-24% stood in attack position (I hate that term but folk generally understand it)
That's noticably more sag than I run on any other bike as the sommet is more of a plower than any other bike I have. All bikes run more rear sag than front with the Sommet having the least difference between the two too by quite a bit. I run exactly the same set-up everywhere (as I do individually for all my bikes mainly for consistency) occasionally upping tyre pressures if riding flatter local fast less tech riding, especially if linked by road. But that's it.

Yeah. Stands to reason stiffer settings (and tyre pressures/compounds for that matter) will improve speed/acceleration/directness of any bike for smoother less gnarly trails.

and yeah. what works for one rider isn't necessarily anywhere close to what works for another and why questions about set-up often have no true correct answer.

blahblah infinity etc ;)
 

EMTB Forums

Since 2018

The World's largest electric mountain bike community.

561K
Messages
28,387
Members
Join Our Community

Latest articles


Top