Fuel EXe Fuel EXe Suspension Modifications/Questions

Piccirilli

Member
Jan 17, 2023
37
33
Asheville, NC
I recently found out the Rockshox super deluxe + rear shock that comes on the 9.8 has 0 tokens and one 5mm stroke reducer. It also comes stock with the progressive can, similar to the megneg on previous models. Has anyone tried removing the 5mm stroke reducer to increase travel without having issues touching frame, etc? I"m questiong if the added 12mm travel is worth the risk.
 

Swingset

Active member
Sep 9, 2022
276
310
Southern Cal
I am a big boy. I took out the 5mm spacers in the Float X and with no air in it bottomed the shock. No clearance issues. I have hard time getting near the bottom anyway. I think with the leverage ratio you are about 152mm.
 

Oscar74

Member
Jan 15, 2023
40
24
Italy
I am a big boy. I took out the 5mm spacers in the Float X and with no air in it bottomed the shock. No clearance issues. I have hard time getting near the bottom anyway. I think with the leverage ratio you are about 152mm.
What's your bike frame size?
 

Swingset

Active member
Sep 9, 2022
276
310
Southern Cal
In general, the stock Fox settings for air pressure are way too high for me. I was getting only 2/3rds of travel and I have been trending down on pressure and reducing tokens to use more of it. I'm 63 and my days of jumping are pretty much done. So take my advice it for what its worth.
 

Canyon Shawn

Active member
Feb 4, 2023
294
191
Lake Sherwood, California
In general, the stock Fox settings for air pressure are way too high for me. I was getting only 2/3rds of travel and I have been trending down on pressure and reducing tokens to use more of it. I'm 63 and my days of jumping are pretty much done. So take my advice it for what its worth.
Yeah same here, I’m 57. I’m an ex pro open class Motocrosser. So, I can bomb down a chunky hill pretty quickly. But, I was never really into getting air on my mountain bike. I like to ride flowy singletrack more than anything else. I’m finding with this bike, I really like to climb also. I also noticed that the suspension settings from the app for my weight are to stiff. So yesterday, I changed my weight from 175 to 160 in the app and I used those settings. I am undecided, if I like that better or not. But, I did use about 2/3 of the travel. I do like the front and rear balance with the suggested app settings. I ordered the low speed compression adjuster. So, I’m hoping I can open that up a little and help the small and medium bump compliance.
 
Last edited:

jabar1975

Member
Feb 16, 2023
51
33
Zurich
Anyone moved to Ohlins stable? I am thinking about putting RFX36 m.2 on front and TTX22 on rear (or ttx2 air). Just wonder if the trik wit 62,5stroke will work in L size 9.5
 

Swingset

Active member
Sep 9, 2022
276
310
Southern Cal
After a bunch of playing with tokens and air pressure and bit of clicker twiddling I have my Factory 38 working pretty well. It came with 3 tokens and I took out 2. Air pressure is below what they recommend and the clicker settings are consistently more open by one than baseline. Getting nearly full travel on the hard hits and its smooth as butter. A small secret is to make sure the grease in the air shaft on the negative side does not clog the transfer ports. Sometimes too much is too much.
 

Canyon Shawn

Active member
Feb 4, 2023
294
191
Lake Sherwood, California
So, today I let the air out of my suspension and pumped it back up the recommended way, by cycling the suspension a couple of times on the way up to the recommended PSI, to get air into the negative side. It made a big difference on the small bump sensitivity. Because of the rain I was only able to take a fire road with small bumps in it. But, my guess is that it will also help with the medium bumps. So, right now I’m a lot more happy with the suspension.
1132C773-0A17-430A-AB2A-BD612863987B.jpeg
 

volts

Active member
May 15, 2018
343
266
DK
So, today I let the air out of my suspension and pumped it back up the recommended way, by cycling the suspension a couple of times on the way up to the recommended PSI, to get air into the negative side. It made a big difference on the small bump sensitivity. Because of the rain I was only able to take a fire road with small bumps in it. But, my guess is that it will also help with the medium bumps. So, right now I’m a lot more happy with the suspension. View attachment 108978
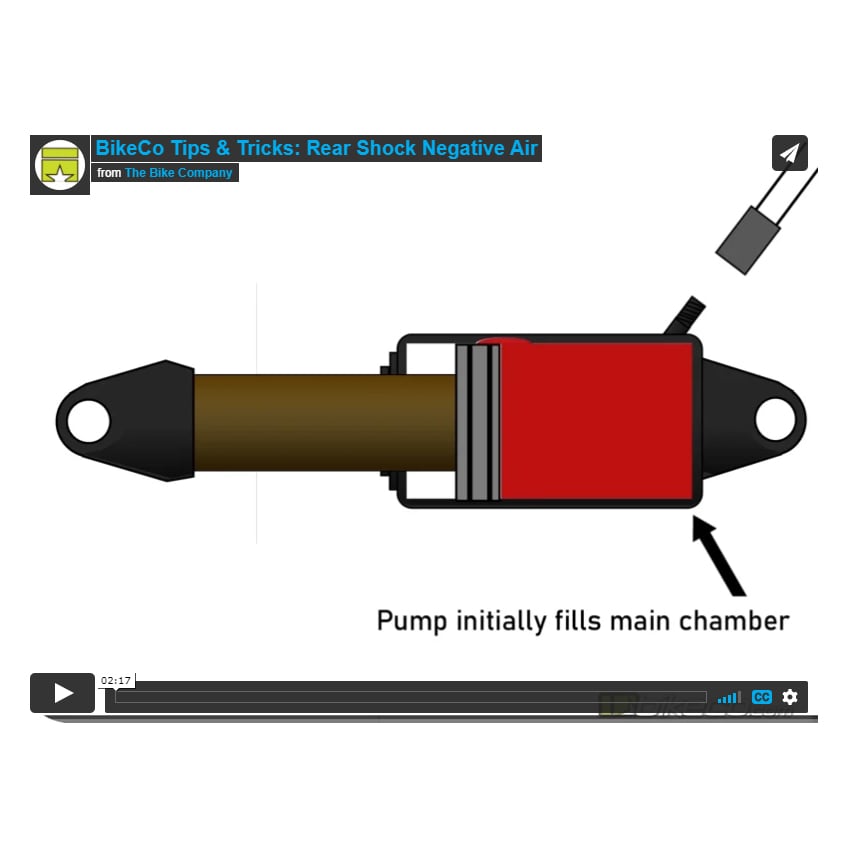
Not sure if it's placebo then? It should even itself out even if you don't pump it up that way after a while. It is just that the port is located a bit into the travel and if the negative chamber is low pressure you will have a harder time cycling it but jumping on it a few times should get you there. Feels like shit at first and then get more and more normal.
 

Canyon Shawn

Active member
Feb 4, 2023
294
191
Lake Sherwood, California
Not sure if it's placebo then? It should even itself out even if you don't pump it up that way after a while. It is just that the port is located a bit into the travel and if the negative chamber is low pressure you will have a harder time cycling it but jumping on it a few times should get you there. Feels like shit at first and then get more and more normal.

Well, I actually know a lot about dirt bike suspension, having being a Pro Open class motocrosser. And, I also know a lot about setting cars up for canyons. It took me a while to figure this out in my brain. My suspension knowledge is a little rust. But, here’s what happens, If you don’t cycle the suspension to get air into the negative spring. It does get in there, like you said. But, it drops the PSI down after you’ve put air in and pulled the pump. Then you have more than you need on the negative side. So, then the suspension wants to blow though the initial part of the travel. The initial part of the travel soaks up the small bumps. The negative side needs to be a certain percent of the positive side. That’s achieved by cycling the suspension from the get go. I could feel the difference, in the garage, before I even got on the bike, by just pushing down on the suspension. With your idea, it’ll blow through the initial stroke and won’t want to ramp up at all in the mid stroke. That whole senerio also really affects the rebound side. So what you get is a really dead feeling suspension that doesn’t want to flatten anything out. Most people feel that Fox’s PSI recommendations are too high. But, that’s exactly why they recommend the pressures that they do.
 

clivem25

New Member
Mar 5, 2023
37
25
Perth Western Australia
Well, I actually know a lot about dirt bike suspension, having being a Pro Open class motocrosser. And, I also know a lot about setting cars up for canyons. It took me a while to figure this out in my brain. My suspension knowledge is a little rust. But, here’s what happens, If you don’t cycle the suspension to get air into the negative spring. It does get in there, like you said. But, it drops the PSI down after you’ve put air in and pulled the pump. Then you have more than you need on the negative side. So, then the suspension wants to blow though the initial part of the travel. The initial part of the travel soaks up the small bumps. The negative side needs to be a certain percent of the positive side. That’s achieved by cycling the suspension from the get go. I could feel the difference, in the garage, before I even got on the bike, by just pushing down on the suspension. With your idea, it’ll blow through the initial stroke and won’t want to ramp up at all in the mid stroke. That whole senerio also really affects the rebound side. So what you get is a really dead feeling suspension that doesn’t want to flatten anything out. Most people feel that Fox’s PSI recommendations are too high. But, that’s exactly why they recommend the pressures that they do.
Well, no to be blunt. The negative and positive chambers will ALWAYS equalise and be at the same pressure at X% of travel. If you pump up the fork without cycling it you'll just end up with 10 - 15 psi less than intended after a few compressions.
 

volts

Active member
May 15, 2018
343
266
DK
Well, I actually know a lot about dirt bike suspension, having being a Pro Open class motocrosser. And, I also know a lot about setting cars up for canyons. It took me a while to figure this out in my brain. My suspension knowledge is a little rust. But, here’s what happens, If you don’t cycle the suspension to get air into the negative spring. It does get in there, like you said. But, it drops the PSI down after you’ve put air in and pulled the pump. Then you have more than you need on the negative side. So, then the suspension wants to blow though the initial part of the travel. The initial part of the travel soaks up the small bumps. The negative side needs to be a certain percent of the positive side. That’s achieved by cycling the suspension from the get go. I could feel the difference, in the garage, before I even got on the bike, by just pushing down on the suspension. With your idea, it’ll blow through the initial stroke and won’t want to ramp up at all in the mid stroke. That whole senerio also really affects the rebound side. So what you get is a really dead feeling suspension that doesn’t want to flatten anything out. Most people feel that Fox’s PSI recommendations are too high. But, that’s exactly why they recommend the pressures that they do.
It's just a dimple in the can that makes it equalize. No rocket science. It will equalize. On the picture here it's marked with "transfer port".
1678788262484.png

It also sounds like you have maybe misunderstood what rebound damping is. It doesn't have to do with positive and negative air chamber equalization. Rebound damping is the oil flow restriction when the shock is returning to the neutral position from being compressed.

GMBN have made a decent explanation of it here (although you should maybe not trust most of GMBN resources these days at it is mostly just ads and infomercials)
I haven't actually watched the entire thing and vetted it but it seems to give an OK walk-through of the basics.
 
Last edited:

Swingset

Active member
Sep 9, 2022
276
310
Southern Cal
Except this vid does not mention the negative pressure side at all. Air springs are tricky in that the designer has to put in an equalizer to help balance the pressures to get the fork to into the correct range to mimic a fixed length coil. An air spring is 'infinite' in length. With no top out device (air bleed ports) the fork would slam into the extension stop as the load goes to zero on the rebound side and the spring still has 100psi extending it. I think if you get the sag right and play with tokens at the end of stroke you will probably get a spring curve that you can damp.
 

Canyon Shawn

Active member
Feb 4, 2023
294
191
Lake Sherwood, California
The negative side did not need to be mentioned in the video. Like you guys said the air eventually makes its way to the negative side. What I was getting at, the way I was putting air in my fork, I was ending up with way less pressure, then I should be running, on the positive side. Therefore, my suspension was blowing through the initial stages of travel. That’s why small bump sensitivity was suffering. Now that I’ve done it correctly , small bump sensitivity is not suffering. You see how that works? Jim felt, Johnny O’Mara‘s tuner, taught me this a long time ago, when I was having the same issue on my CR500. I actually ended up going with a slightly stiffer spring, which kept the fork up into the initial part of its travel, which solved my problem. It’s just one of those things I forgot about it.
 

volts

Active member
May 15, 2018
343
266
DK
He is just talking about not chasing the "subtledragon" by continually lowering pressure since it can make it become even more harsh. This is a completely different topic.
He is also talking about not always having to use full travel (depending on trail). That is also very well outside of the current discussion until now.
I mean, you start out by saying that equalizing negative chamber must be done a little at a time and you end up talking about how to set up spring rate. It's two different things but then you also start talking about rebound. Yes spring rate affects rebound, but that has nothing to do with how you equalize the two chambers.
It is possible that you confuse the self equalizing system being used on most modern forks and shocks for MTB with other systems where you have two different valves that need to be pressurized independently for greater control of chambers, but that's why I showed you a picture of how it works on the shock.
I get the feeling that you do not have a very firm grasp on how suspension works. There is no shame in that. We all have to learn at some point. If you want to believe whatever it is you believe that, is fine too I'm not trying to convince you and I am not interested in a discussion about these basics, but if you genuinely want to learn that's cool and we can have a discussion.
 
Last edited:

Canyon Shawn

Active member
Feb 4, 2023
294
191
Lake Sherwood, California
He is just talking about not chasing the "subtledragon" by continually lowering pressure since it can make it become even more harsh. This is a completely different topic.
He is also talking about not always having to use full travel (depending on trail). That is also very well outside of the current discussion until now.
I mean, you start out by saying that equalizing negative chamber must be done a little at a time and you end up talking about how to set up spring rate. It's two different things but then you also start talking about rebound. Yes spring rate affects rebound, but that has nothing to do with how you equalize the two chambers.
It is possible that you confuse the self equalizing system being used on most modern forks and shocks for MTB with other systems where you have two different valves that need to be pressurized independently for greater control of chambers, but that's why I showed you a picture of how it works on the shock.
I get the feeling that you do not have a very firm grasp on how suspension works. There is no shame in that. We all have to learn at some point. If you want to believe whatever it is you believe that, is fine too I'm not trying to convince you and I am not interested in a discussion about these basics, but if you genuinely want to learn that's cool and we can have a discussion.
Dude, you need to check yourself. Your response was rude AF! Your panties are all twisted up because I’m talking about a different suspension subject. It’s a suspension thread, I’ll discuss anything suspension, I feel like discussing. I found something that works for me and I passed it on. You don’t like it? Keep moving! I have a good understanding of how suspension works. And, no I don’t need to discuss it with you. And I certainly do not need your rude advice.

Disclaimer: I’m going to discuss a different suspension topic. Stained panties may be twisted.

So, my girlfriend ordered the LSC compression adjuster kit from her bike shop for the Fox Performance Float X shock on the 9.7. I’d pass on how much it was, but I get everything at wholesale prices. So, I have no idea how much they are. Freeing up the LSC helps soak up the small to medium rolly type of stuff. For those of you that don’t know. This shock comes with a plastic cap, where the LSC adjuster comes on the more expensive Fox shock. So, you can take that plastic cap off and install the LSC adjuster kit that comes from Fox. That kit part number is: 808-17-470-KIT.
 
Last edited:

volts

Active member
May 15, 2018
343
266
DK
Dude, you need to check yourself. Your response was rude AF! Your panties are all twisted up because I’m talking about a different suspension subject. It’s a suspension thread, I’ll discuss anything suspension, I feel like discussing. I found something that works for me and I passed it on. You don’t like it? Keep moving! I have a good understanding of how suspension works. And, no I don’t need to discuss it with you. And I certainly do not need your rude advice.

Disclaimer: I’m going to discuss a different suspension topic. Stained panties may be twisted.

So, my girlfriend ordered the LSC compression adjuster kit from her bike shop for the Fox Performance Float X shock on the 9.7. I’d pass on how much it was, but I get everything at wholesale prices. So, I have no idea how much they are. Freeing up the LSC helps soak up the small to medium rolly type of stuff. For those of you that don’t know. This shock comes with a plastic cap, where the LSC adjuster comes on the more expensive Fox shock. So, you can take that plastic cap off and install the LSC adjuster kit that comes from Fox. That kit part number is: 808-17-470-KIT.
Sorry I didn't mean to offend you. That was not my goal. You were giving factually wrong info and sounded confused about a few other things and I thought I was helping.
But thanks for repeating Swingsets excellent post regarding the kit. It can do with repeating since it's such excellent info.
 
Last edited:

Canyon Shawn

Active member
Feb 4, 2023
294
191
Lake Sherwood, California
Sorry I didn't mean to offend you. That was not my goal. You were giving factually wrong info and sounded confused about a few other things and I thought I was helping.
But thanks for repeating Swingsets excellent post regarding the kit. It can do with repeating since it's such excellent info.
Ok, it’s ok. But no, I didn’t give any wrong factual info, and I am not confused.
 

JP-NZ

E*POWAH Elite
Feb 17, 2022
1,195
911
Christchurch - New Zealand
This is an interesting conversation, I believe for my next bike I'll be tossing up between the EX-E 9.8 and 9.7.

The Lyric on the 9.8 is good but I'm not sure how much better it will be than the Grip 36 on the 9.7. The rear shocks do look a bit closer in terms of spec. I do like Fox suspension (y)
 

Canyon Shawn

Active member
Feb 4, 2023
294
191
Lake Sherwood, California
That’s why I bought the 9.7. I’d rather have the Fox suspension. And, I can upgrade the other parts, pretty cheaply, to suit my needs. Oh, and the Penny Flak is my favorite. There’s nothing like mounting Penny and pumping her for all she’s worth. 🤣
 

Canyon Shawn

Active member
Feb 4, 2023
294
191
Lake Sherwood, California
I installed the LSC adjuster kit today. It’s super easy, once you realize not to push in the collar/spring/ball bearing assemblies all the way in the holes. You have to leave room between the four ball bearings and the adjuster shaft, so the blue adjuster knob can slide over the adjuster shaft. Once the knob slides over the shaft, you can push the assembles in two at a time with your fingers, tilt the knob over them and repeat that with the other two assemblies. I used a little Finish Line grease to hold the collar/spring/ ball bearing assemblies together and in the holes. It goes grease on the spring, put it in the collar, put the ball bearing on top of the spring, push it in and install that assembly, ball bearing first into the hole. The kit comes with 5 ball bearings. You won’t need to use the one small ball bearing, as that size ball bearing is already under the black cap. It’s that ball bearing the stops the adjuster knob at full open and full closed. Without that ball bearing you could just keep spinning the knob around and around. The factory setting is 7 clicks open from full firm. So I can open or lighten up the LSC another three clicks. I was hoping that I could open up the LSC a little more. Because, this bike just doesn’t bob under pedaling loads at all. So, I’m going to leave it fully open and I’ll see what it feels like tomorrow. This is a picture with the adjuster in the original position, as it was under the black cap. I also included a diagram, so you can see how everything works.
A213102F-C8EE-46B3-8939-E1F9DD4AD353.png
759CB8CD-57ED-4F6E-8C3F-44CE627E18B3.jpeg
 
Last edited:

ZillaG

Member
Nov 15, 2022
58
43
Cary, NC USA
Received and installed the LSC knob kit to convert the Float X to a Float X 'Elite'. Couple of observations. The plastic cap can be rotated to four positions in 90 degree increments to change the LSC on the the Performance as is- it is set to full open from the factory. When you pop the cap off you will see the keyed shaft and ball detent. My advice is do the conversion on a tray of some sort as there are a number of very small parts that can get away from you. Grease is your friend holding the springs, detents and balls in place.

The trick is to not push the four detent assemblies into the bores in the shock very far. The balls prevent the cap from going in if you do. Once the blue cap is indexed to the key on the LSC shaft you can push it down against the detents and slowly start pushing the detents in under the lip of the cap. If you apply constant pressure in the LSC knob its pretty easy. Once the cap finds the groove its probably on there forever.

For $30 all in with shipping and tax this was a worthwhile experiment.

View attachment 105117 View attachment 105118 View attachment 105119 View attachment 105120
Is there a video for installing this? I couldn't find it in YouTube.

@volts provided this link though so it's better than nothing
 
Last edited:

EMTB Forums

Since 2018

The World's largest electric mountain bike community.

554K
Messages
28,010
Members
Join Our Community

Latest articles


Top