Drilling holes in my Levo!

junglie69

Member
Mar 22, 2018
52
49
Warminster
Let me explain.

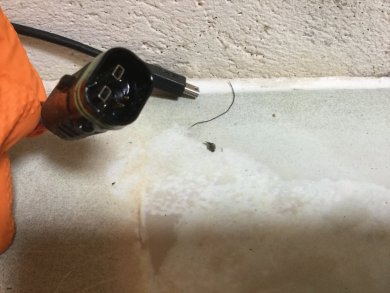
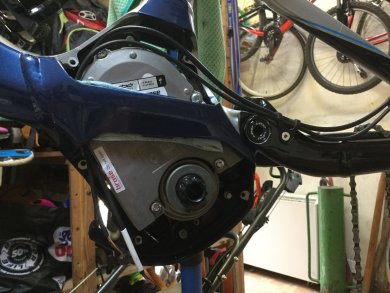
The Problem, this is after a few rides, washing with Muc off and light pressure garden hose. This is as recommended by Specialized Rider care UK, I had email correspondence with them I can post the emails for those that wish to see. Suffice to say this is the procedure they use for their test/demo fleet.
IMG_1222.JPG IMG_1223.JPG IMG_1230.JPG
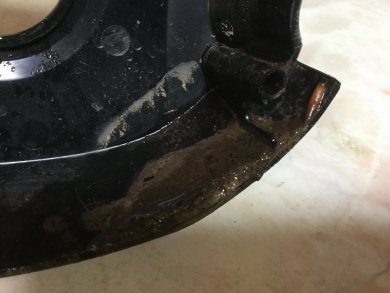
The photos show a build up of silt which comes from riding in muddy wet conditions and washing said mud off. Whilst it is fairly obvious Specialised did not fully consider these conditions it is left up to us to live with the consequences. The silt builds up blocking the inadequate drain hole and gets to the same level as the electric plugs, with the inevitable results. The plugs out of interest were all wet inside so much for waterproofing. The speed sensor plug did not have a rubber seal and the remote had only one of two seals, so much for quality control the bike is only a few months old. After drying and a smear of dielectric grease plugs were reinserted.

IMG_1225.JPG IMG_1227.JPG IMG_1229.JPG

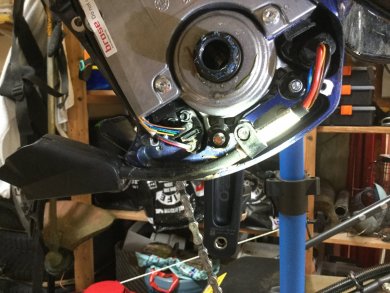
The drain hole you can see in one of the photos is still blocked from both sides although you cannot see that with the motor in. Yes the only way I could clean it properly was to take the motor out.

IMG_1234.JPG IMG_1235.JPG IMG_1236.JPG

With the motor back in all plugs cleaned and connected and drain hole cleared it's ready to go back together. The problem hasn't gone away however. Water and silt will still get in from the areas shown below and cannot easily be blocked nor perhaps should they?

IMG_1220.JPG IMG_1221.JPG

My solution and I am experimenting here so please don't try this unless you agree with me, is to drill a 7mm hole in the lower motor cover each side to allow decent drainage. Water and silt in - drain holes allow it out, simples! I hope. I felt I couldn't leave as was, I will come back to this post after a few more rides and strip and inspect again.

IMG_1237.JPG

Taking the motor out cleaning and motor back in took just over an hour minus tea breaks for pondering.

Any thoughts, comments welcome. If it does not work as intended I have a couple of rubber grommets to plug the holes so its not a disaster.
 

Doomanic

🛠️Wrecker🛠️
Patreon
Founding Member
Jan 21, 2018
8,725
10,392
UK
You can get rubber blanking grommets from motor factors/eBay/etc that would do the job.
 

Rob Rides EMTB

Administrator
Staff member
Subscriber
Jan 14, 2018
6,260
13,700
Surrey, UK
Hi Junglie,

That is a very thorough strip down that you’ve done there. Interesting that you’ve found that level of crap built up on a fairly short time.

How difficult is it to remove the motor etc? I’d like to give it a go.

Cheers
Rob.
 

Tori

Active member
Apr 1, 2018
282
423
Australia
Good info, appreciated. I hope I don't accumulate too much crap in the base of my engine, it's not ideal.
 

Mountie

Well-known member
Apr 29, 2018
421
254
Canada
The 2018 Levo has a much larger drain hole has anyone had the issue on them yet? Mines been good so far. The hole is oval now.
 

junglie69

Member
Mar 22, 2018
52
49
Warminster
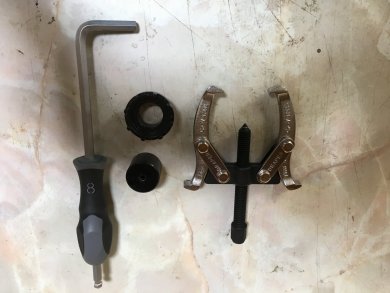
Thanks for the comments and feedback. I obtained a kit from Chris at Berkshire bikes to remove the crank, puller and most important a cap for the axle stub, if you don’t use you risk damaging the torque sensor. It all sounds complicated however once into the process stripping cleaning and reassembly took just over an hour. Now I’ve drilled the holes I’m hoping I won’t have to remove the motor in future just remove non drive side crack and cover to check for crud and damp. Talking to Specialized Rider Care UK they are recommending a Corosion Block spray which they are using on all Levos.

I’m going to remove tommorow to check how the holes are working I’ll post photos and a photo of the crank removal kit. The procedure is in a PDF already available in the Specialized Turbo Levo thread.
 

junglie69

Member
Mar 22, 2018
52
49
Warminster
Hi as promised a follow up to my initial post. Thanks for the input this is mainly preventative, I want to keep my bike running without downtime, Warranty or not.

The new drainage holes seem to be working, a little silt residue but all is good and most important the electrical connectors are sound and dry.

Just a few points first, it was mentioned above, why not use a bung, my idea with the extra drainage holes was to allow continuous drainage. Allowing water and silt to build up then pulling the bung to drain seems counter intuitive.

Mine is a 2018 Levo with the supposed larger drain hole!

I have put all my information together in a PDF below which may be easier than clogging the forum up. The PDF I used to take the motor out is on page 3 of the Official Specialised Turbo Levo thread. Finally to remove the crank you need a few additional tools. The kit I obtained from Berkshire bikes is here.

IMG_0546.JPG
 

Attachments

  • Specialized Turbo Levo 1.pdf
    198.5 KB · Views: 1,198

Rob Rides EMTB

Administrator
Staff member
Subscriber
Jan 14, 2018
6,260
13,700
Surrey, UK
Hi as promised a follow up to my initial post. Thanks for the input this is mainly preventative, I want to keep my bike running without downtime, Warranty or not.

The new drainage holes seem to be working, a little silt residue but all is good and most important the electrical connectors are sound and dry.

Just a few points first, it was mentioned above, why not use a bung, my idea with the extra drainage holes was to allow continuous drainage. Allowing water and silt to build up then pulling the bung to drain seems counter intuitive.

Mine is a 2018 Levo with the supposed larger drain hole!

I have put all my information together in a PDF below which may be easier than clogging the forum up. The PDF I used to take the motor out is on page 3 of the Official Specialised Turbo Levo thread. Finally to remove the crank you need a few additional tools. The kit I obtained from Berkshire bikes is here.

View attachment 1386
This is fantastic, thank you!
 

SteveVentoux

Active member
Patreon
May 13, 2018
174
152
Bucks

junglie69

Member
Mar 22, 2018
52
49
Warminster
Hi not really most of the water/muck gets in via a small slot at the top right back of the motor housing, it just isn’t sealed there. Having looked at the carbon versions the area I mention is a much cleaner design and may well give better protection. The best thing is for either you or a LBS if you buy from one to check the electrical connections. So, all o rings present, some corrosion block on the terminals and a smear of dielectric grease to help seal the connectors in their housings. Some of the LBS are doing this as a matter of course. Hope this helps in your difficult decision.
 

SteveVentoux

Active member
Patreon
May 13, 2018
174
152
Bucks
Ah OK, thanks for the info, certainly seems like owning an Ebike adds an extra layer of complexity when it comes to cleaning / preventative maintenance. Hopefully worth the effort though!
 

junglie69

Member
Mar 22, 2018
52
49
Warminster
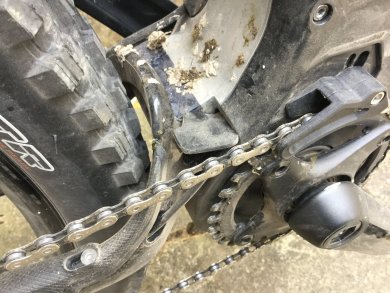
I had a good reply from Specialized re the missing o’rings, they were in the post the next day once they had seen the pdf above! Apparently dealers have been instructed to apply a product called Corrosion Block to the battery connector which is where they are having most of the electrical problems. Water and muck makes it’s way in via the opening at the back top right o f the motor housing ie where it’s been left open, certainly on the alloy framed models.
This moisture perversely makes its way over to the other side due to the motor position on the housing draining directly over the battery connector.

So my idea is a widget to minimise muck entry thrown down by the wheel and chain, yes it still gets in even if you have a mudhugger fitted. It’s just a piece of rubber, same stuff used to stop frame rub on fitted mudguards etc, cut to shape and held in place with (this is the cunning bit) Velcro on the inside. Two rides in it has remained in place, doesn’t interfere with the chain and no mud, stones or any other debris has got in - result. Shame specialized didn’t think of something similar.

D86AE3E9-71B2-4312-9A75-577C6256E847.jpeg
 

ccrdave

E*POWAH Elite World Champion
Patreon
Founding Member
Jan 16, 2018
1,421
1,125
uk
I am considering putting shrink wrap over the joint where the battery cable plugs into the motor
 

Kiwi in Wales

Short cranks rule!🏴󠁧󠁢󠁷󠁬󠁳󠁿
Patreon
Founding Member
Jan 24, 2018
1,241
1,589
Carmarthen, Wales
Hi all,

I have just come back to the forum after a few months, I had the same issue on my 2017. They had to replace my motor due to water ingress. All good now but I have had to do a few modifications because I really do not want to have to replace my motor again.

I will post some pictures (when I can) of what I have done to stop grit, pine needles, etc getting in to the motor enclosure.
I have used ‘motocross foam’ which is working really well as it stops most of the above mentioned crap getting in to the motor enclosure. I have enlarged the sump hole and added some additional holes in the hardened plastic motor covers.

What is happening here is a clear design problem that needs to be resolved. The bike must have been designed and tested in a place where it clearly does not rain like it does in South Wales ?
 

Mountie

Well-known member
Apr 29, 2018
421
254
Canada
Let me explain.

The Problem, this is after a few rides, washing with Muc off and light pressure garden hose. This is as recommended by Specialized Rider care UK, I had email correspondence with them I can post the emails for those that wish to see. Suffice to say this is the procedure they use for their test/demo fleet.
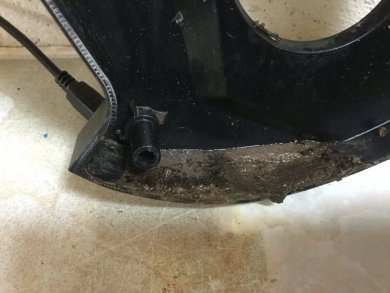
View attachment 1280 View attachment 1281 View attachment 1282
The photos show a build up of silt which comes from riding in muddy wet conditions and washing said mud off. Whilst it is fairly obvious Specialised did not fully consider these conditions it is left up to us to live with the consequences. The silt builds up blocking the inadequate drain hole and gets to the same level as the electric plugs, with the inevitable results. The plugs out of interest were all wet inside so much for waterproofing. The speed sensor plug did not have a rubber seal and the remote had only one of two seals, so much for quality control the bike is only a few months old. After drying and a smear of dielectric grease plugs were reinserted.
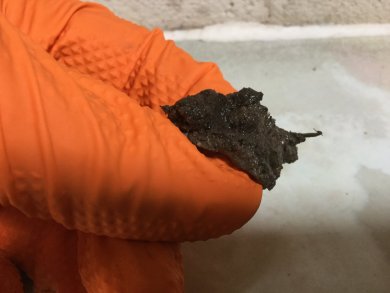
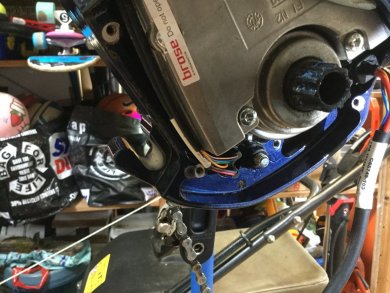
View attachment 1283 View attachment 1284 View attachment 1285

The drain hole you can see in one of the photos is still blocked from both sides although you cannot see that with the motor in. Yes the only way I could clean it properly was to take the motor out.
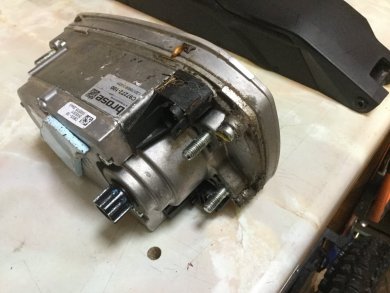
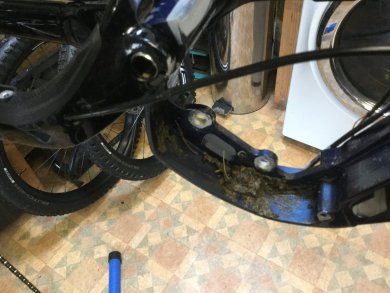
View attachment 1286 View attachment 1287 View attachment 1288

With the motor back in all plugs cleaned and connected and drain hole cleared it's ready to go back together. The problem hasn't gone away however. Water and silt will still get in from the areas shown below and cannot easily be blocked nor perhaps should they?
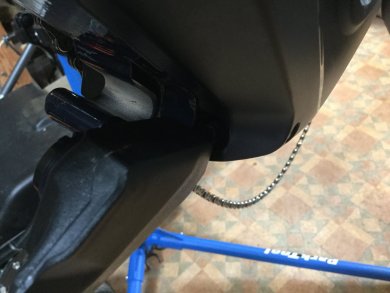
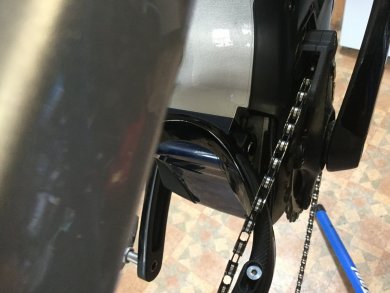
View attachment 1289 View attachment 1290

My solution and I am experimenting here so please don't try this unless you agree with me, is to drill a 7mm hole in the lower motor cover each side to allow decent drainage. Water and silt in - drain holes allow it out, simples! I hope. I felt I couldn't leave as was, I will come back to this post after a few more rides and strip and inspect again.
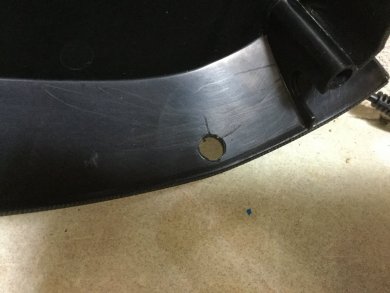
View attachment 1291

Taking the motor out cleaning and motor back in took just over an hour minus tea breaks for pondering.

Any thoughts, comments welcome. If it does not work as intended I have a couple of rubber grommets to plug the holes so its not a disaster.
Any idea what the torque is for the crank arms anyone?
 

junglie69

Member
Mar 22, 2018
52
49
Warminster
Hi Mountie one of the documents posted onthis forum has it I think, here you are,

14. Install crankarms. Apply grease to threads and ISIS splines on crankarms, Tighten crankarm bolts to 50 Nm (442 in-lbf) or until they bottom out Important: ensure that right and left crankarms are installed on proper sides of bike A.

Hope this helps.
 
Last edited:

Mountie

Well-known member
Apr 29, 2018
421
254
Canada
Hi Mountie one of the documents posted onthis forum has it I think, here you are,

14. Install crankarms. Apply grease to threads and ISIS splines on crankarms, Tighten crankarm bolts to 50 Nm (442 in-lbf) or until they bottom out Important: ensure that right and left crankarms are installed on proper sides of bike A.

Hope this helps.
I have a good torque wrench bit it feels like it can’t take the torque I don’t have the nerve to keep tightening
 

davegixer

Active member
Jul 7, 2018
217
207
UK
Uhoh, just found this amazing thread. Will check my Kenevo from upside down later that day... hoping to have the new, bigger hole in there.

Just quickly checked mine @Donnie797 as we bought our bikes a few days apart; it's a substantial hole so I think we're good. Will keep an eye on it, to keep unblocked when the rains come.
 

Mountie

Well-known member
Apr 29, 2018
421
254
Canada
Mine is an 18 it has a much bigger oval hole never been blocked. My 17 blocked and made the motor quit after a particular muddy ride.
 

Mountie

Well-known member
Apr 29, 2018
421
254
Canada
I worried about stripping cranks never seem to bottom out but I did stop. Is it normal for it to go tight loose tight loose, tight during the tightening process? It does feel very tight but didn’t bottom out and the torque wrench never clicked 50nm.
 
Last edited:

EMTB Forums

Since 2018

The World's largest electric mountain bike community.

554K
Messages
28,017
Members
Join Our Community

Latest articles


Top