DIY: Range extender for Levo (and Kenevo)

nyx

New Member
Oct 10, 2019
25
60
France
Hello there,

Sorry for the delay for updates but as my favourites biking spots are under the snow now I've not been able to do a full range test with the extender, and the bike won't go out for a while...
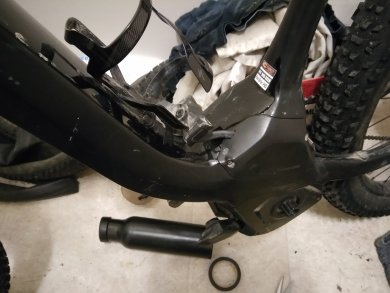
But anyway for waiting the spring here are some pictures of the extender in place in the bike.

It's a bit difficult to take in photos as everything is inside, but tell me if you need more photos.

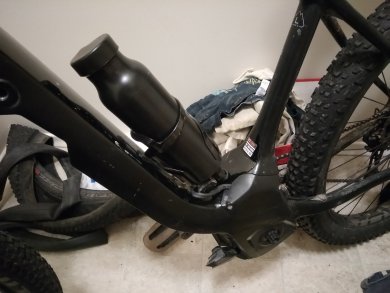
Here is the battery inside the frame.
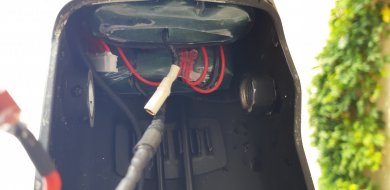
20191110_115244.jpg

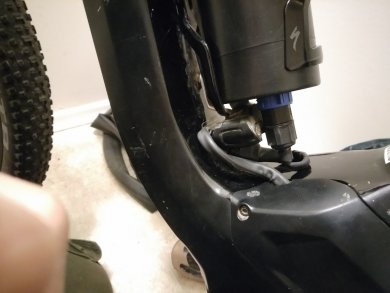
The cable going from the battery to the diodes which are above the motor.
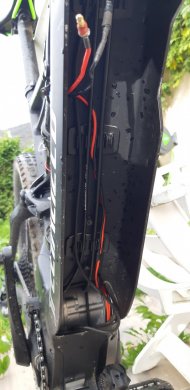
20191110_115250.jpg

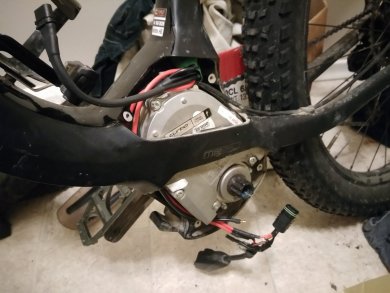
And here we can see a very small part of the diodes which are installed vertically above the motor inside frame.
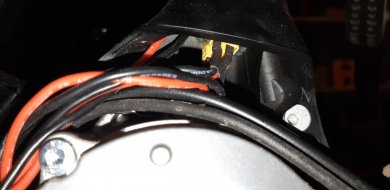
20191110_094752.jpg

Then cables are going below the motor, nothing to say here.
Once the main battery in place its absolutly impossible to see anything about the range extender .
 

fazibazi

New Member
Nov 9, 2019
21
20
Poland
Question. Is it possible to run Levo on non Specialized battery only? As you would start to ride your bike and will it supprot you (default settings) without main, original Specialized battery even turned on? I ve got 28 lion cells in very good condition and all frame of the original battery (spare) with rosenberg plug. If i would build an 36v packet with aftermarket BMS and connect it to Brose will it run?
 

Zimmerframe

MUPPET
Subscriber
Jun 12, 2019
13,998
20,749
Brittany, France
Question. Is it possible to run Levo on non Specialized battery only? As you would start to ride your bike and will it supprot you (default settings) without main, original Specialized battery even turned on? I ve got 28 lion cells in very good condition and all frame of the original battery (spare) with rosenberg plug. If i would build an 36v packet with aftermarket BMS and connect it to Brose will it run?

I think the TCU is built into the battery on the semi integrated batteries, so you'd need to replace that with either an egenesis one or a brose one, like on a e-st900.
 

nyx

New Member
Oct 10, 2019
25
60
France
Hello there,

@fazibazi , no you can't run the bike with an external battery without the main battery. You always need to have the main battery connected and powered on to communicate with the bike…

Concerning my range extender, thank's to higher temps here, I've been able to do a full range test. It's not on my usual +1500m track but it's a pretty good test as temps where lower than usual (I am biking almost only during summer) so less range, and I had a lot of mud so more than usual use of the turbo mode.

then, with the range extender I have been able to reach +1556m of elevation and 42km of distance. the Main battery was at 18% when arrived at home.

I think it's pretty good result. Indead, on my usual trip I do about 1500m and 32km of distance, but the battery is empty, near 7%, and on this track I use less the turbo mode than I did on this test tour. moreover, the 8°c temperatures probably reduce my batteries life time.

I'll push further my tests in spring, but I am pretty happy with this small and fully integrated range extender :)
 

fazibazi

New Member
Nov 9, 2019
21
20
Poland
Ok i am testing some LGBMJ (INR18650MJ1) will see what i can get from them.

56yqsD78HoAkSvoWijxOtZnboMUQFquDDH-g8zSxUEonMb-91ikpwyfnUR8wbb9_1XukjjQXP55ezwvm3D3jhcZsqm--pbzX1KP3QVQSLNeXnDelh3mv21_Z5PTjw1RIhd2BhzeAzM616G0hx7-9NVGqmEB6FoGWij5hEGTIJP1oWbGhZC6P5BLgaYCJsr8ECptg3iaOQUoagMWDuRf1iD72YkhDIolL4uqpKxj2VGqncY_-sOdiHdb9DuQHlVIUrO-XSyCj6JbyxExYm_sFl0Uc5kdQKERlfhCmuxXlAAPaF5H-67uq1sY0QOuq34_k7ttQ0jIKtEY6xB_K_DAKpNapNa_vsgdNz1WOmzS6TmB3zlk80AzqMVD0jGgTbUmhNQhEeFuKTlqurVEfFmg5bkiyiSG1Z3n_AOssljSs3vgNVuqk3oOVjFENLk44Vb0SWBMJ48olToW-M1FvUsHrbbL7K-ndX_PibPn-0VNJQmqJQ_6PEzPI6QuJEB3Z2Ivs4qLb_Qf_Y-jdKYx6AkLeWYurFUd7QV2Y4RwzxiG50IeFuUAiO_4PTucfmA6Hu90lXx507z_iq6M0fnbPDuhNV-6pCZOcOBnLqR4JB_yYZpRBIqz3bjy7Mit8RYcUIKEph7e-yNhkcjUX0JJJnffGPv-p5NflyK_U7e_JIK_oLXfE9wT-xcr9QbVg=w1894-h947-no

Maybe you got photo of the other side of plug (or connector) than rosenberger? The one that plugs into the egnine, Maybe it will be easier to rebuild that connector instead of cut orginal wires?:rolleyes: I mean make a by-pass? But then ill need a plug and a socket.
May it be it below?:
specialized-my19-levo-fsr-battery-engine-cable-220.jpg

images
 
Last edited:

nyx

New Member
Oct 10, 2019
25
60
France
Hello,

I'm sorry I do not have any photos of this and you wouldn't see anything as everything is protected by some heat shrink…

I could have rebuild a cable, but it's pretty expensive to buy. So I just took my Levo's cable, the same as on your photo, cut and naked the bigger red and black wires (the power) and then rewire. It was pretty easy and quickie.
 

jlcortex

Member
Feb 1, 2020
5
4
Valencia Spain
Also thinking here about build a DIY range extender for the kenevo. I'm thinking of use as many cells as possible. I am thinking than 70 cells are possible, 10S7P, 900Wh using 3500mAh cells.

It can weight about 3.5kg, I think it is not problem to carry with 3.5kg in this position

Captura.JPG
 

RCDallas

Active member
May 28, 2019
152
153
Italy
Also thinking here about build a DIY range extender for the kenevo. I'm thinking of use as many cells as possible. I am thinking than 70 cells are possible, 10S7P, 900Wh using 3500mAh cells.

It can weight about 3.5kg, I think it is not problem to carry with 3.5kg in this position

View attachment 25274
That would be some serious range available!
 

freerider85

Member
Dec 20, 2018
41
20
canada
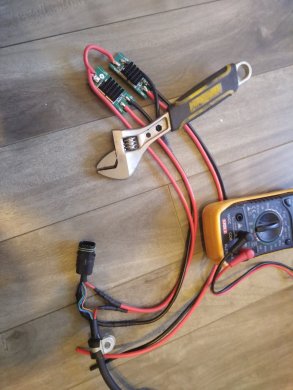
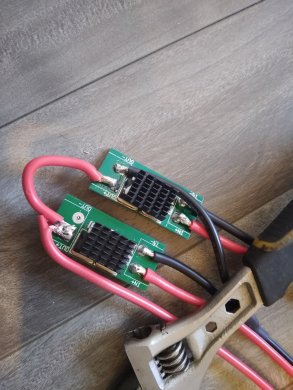
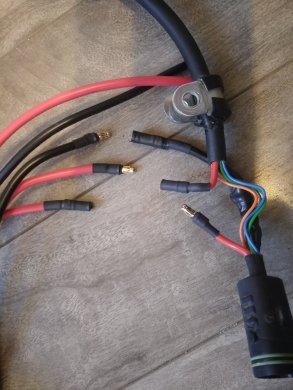
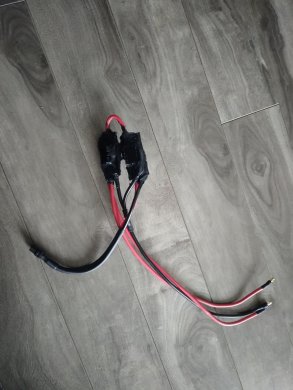
Couple pictures from my little project

Bottle battery 5Ah - 120$ - alibaba
Quick Shipping 36v Ebike Water Bottle Battery With Usb Port - Buy 36v Bottle Battery,Water Bottle Battery,Ebike Bottle Battery Product on Alibaba.com
Two ideal diodes - 10$ - aliexpress
US $3.22 31% OFF|15A Solar Panel Anti Reverse Irrigation Ideal Diode Battery Charging Board-in Solar Controllers from Home Improvement on AliExpress
Cables (12awg) - found in office
XT60 connectors had home and pins- 5$ - aliexpress
Heat shring 5$ local shop
140$ tolal

Thank you for this thread very useful informations here .
Now enough range for me and I can continue with future battery updates .

IMG_20200111_141056.jpg

IMG_20200111_141101.jpg
IMG_20200111_141121.jpg

Pcb is sealed with silicone
IMG_20200112_104522.jpg
and heat shrink
IMG_20200112_105826.jpg

IMG_20200112_110152.jpg

IMG_20200112_112824.jpg
Planning update whole connector on bottle and than shorten cable even more


IMG_20200112_112842.jpg
Dremel for smal hole in motor cover

Cable is almost unvisible (if extender not needed)
IMG_20200112_113113.jpg

updated.jpg
 
Last edited:

G hunter

New Member
Feb 16, 2020
2
0
Calderdale
Hi cool system thinking of doing this myself have u had any problems with diodes overheating if ur running just the main battery by itself so all current is going through a single diode
Thanks
 

freerider85

Member
Dec 20, 2018
41
20
canada
You have two diodes one for each battery so batteries can't affect each other .Yesterday I did 75km in combined terrain and no single (overheat) issue - dioes are cool maybe because I live in Canada :) but I belive they will perform great in 35C+ weather as they come already with heat sink .
 
Last edited:

G hunter

New Member
Feb 16, 2020
2
0
Calderdale
You have two diodes one for each battery so batteries can't affect each other .Yesterday I did 75km in combined terrain and no single (overheat) issue - dioes are cool maybe because I live in Canada :) but I belive they will perform great in 35C+ weather as they come already with heat sink .
Thanks I'm probably looking too much in to it it's just there's a few company's makeing these range extenders for a lot more money
 

casco

Member
Mar 4, 2020
19
9
arouca
Range extenders seem to be a hot topic nowadays and there are already some commercially available options (Levo Range Extender, Levorex, Trailwatts) to select from. However, IMO they are quite expensive. I did not want to pay ~500 EUR for a battery that I need only on those long, full-day rides a few times a summer. Hence, I decided to make one of my own. The technology is basically the same as with the commercial options, but I was able to even tune it with a bluetooth-equipped BMS.

I already wrote a longer how-to in a Finnish cycling discussion forum, but maybe it's good to share the basics here as well, because I bet there are some Doc Emmett Browns in this forum as well interested on the topic. Of course (and for a person, who believes that everyone is responsible of their own mistakes, this sounds stupid) I will not take any responsibility if you burn your bike, blow up your house or lose your eyesight when a cell explodes on your face or any such thing.

LONG STORY SHORT:

Stuff needed:
  • Case to put the battery in (I used a plastic tool pipe that I needed to form with a heat gun)
  • Cells. I recommend to use only quality ones. I used 3350 Ah rated Sanyo 18650 cells ordered from Nkon.
  • BMS. I used bluetooth-enabled "smart" BMS, ordered from GreenBikeKit
  • "Ideal diodes". You need to have a way to avoid current flowing from one battery to another. There are few options for this, but ideal diodes are the best. I ordered that directly from the manufacturer re-voltage.eu
  • All kinds of small stuff (nickel strips, battery holders, wire, shrink wrap, solder, glue, connectors....)
Tools needed:
  • Quality soldering iron
  • Hot air gun
  • Drill
  • Other basic tools
Steps:
  1. Work with the battery case. My plastic tool pipe did not fit L size Levo at first, so I used the heat gun to soften the plastic and then re-formed it to fit in. Reforming made it quite bumpy and lumpy, so I mixed some 2-component plastic/polymer padding, spread it and sanded down. Thats the reason, why you see in some photos that the pipe has white/grey-ish cast.
  2. Assemble the cells. Youtube is full of instructions for this. I made 10S2P, which means roughly 250 Wh. I did not have a spot welding machine, so I ended up soldering the cells together. Having a powerful soldering iron minimizes the time that you need to heat up the cell. Heat = not good. I did try make a spot-welder from car battery, solenoid and some copper nails, but after seeing the colour of lithium flame after puncturing one of the cells (luckily I ordered 21, i.e. one extra), I decided that heat or not, but I will solder them together :D
  3. Connect the BMS. BMSes differ a bit from each other, so I will not give instructions to this either - the basic principle is to have BMS connected to the both ends of the battery (full voltage) and then also to all the +'es in between the battery. This way BMS can monitor the charge, discharge and cell balance.
  4. Bluetooth and other battery connections. I plugged in the bluetooth and the app started to work right away. I was really surprised, asit was so easy. Then, I probably could have had just one set of leads for both charge and discharge, but ended having one for charging (inside the case, which is easy to open) and one outside the case for discharge, i.e. to attach to the bike. The BMS also had two temperature sensors: I put one between the cells and glued the other on top of the BMS heatsink. For charge and discharge connectors I used Amass XT60 that can easily handle the needed currents.
  5. Connections to the bike. Ok, this is important: you don't want the current to flow between the batteries but only from battery/-ies to the motor. In order to do that, I used "ideal diodes" and needed two of them. I'm not an electrical engineer, but I drew a simple diagram for this (check below). I made the connections so that it's not that easy to return the bike to the factory form (I have the diodes on top of the motor, no need to remove the crank to get to them), but you can do this also so that you put the diodes under the motor (like commercial options have) and then have an extra battery -> motor cable. This way you can quite easily take away this tune. In any case, I'm not worried on voiding the warranty on my bike - if the bike has worked already a year, why would it break down anymore at this point :giggle:
  6. All done. I made a test ride and no smoke or flames and based on the iOS app also the extra battery got involved even though the batteries had different voltages to start with, so all good.
  7. Finalization and paint-up. Hey, one needs to have a name for this type of thing. I named this to "Olkiluoto 4". Olkiluoto 3 is a nuclear power plant here in Finland, which has gotten delayed for like a decade due to all kinds of problems during the building phase. It is to be started next year, but I already have Olkiluoto 4 up and running over here :cool:
Cost:
  • Case ("free" as I had it laying in the carage)
  • Cells (~90 EUR)
  • BMS (35 EUR)
  • Ideal diodes (63 EUR for two)
  • Small things (15-20 EUR)
  • iOS app (1 EUR)
--> ~210 EUR I also bought 2 Amps @ 42 V charger (25 EUR).

Links:
Photos:
_small.jpg

Tool pipe is taking its shape. It has already seen the heat gun as it fits the Levo frame. I needed to turn the CC coil show up-side down.

_small.jpg

Cells are already soldered and BMS being soldered. Zip tie is keeping the BMS in place during this.

_small.jpg

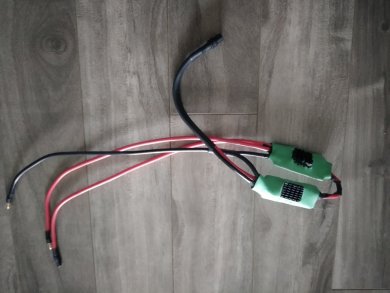
Wiring up the bike. Ideal diodes are under the shrink wraps. They fit well on top of the engine. I used 4 mm2 wires which probably were an overkill. I also secured the + wires with additional webbing in the places where it might get some friction and wore out the insulation.

_full.jpg

A simple diagram for wiring up the diodes. "Lisäakku" = the extra battery. "Levon oma akku" = Levo's own battery. "Pyörän moottori" = the motor.

_small.jpg

All secured inside shrink wrap, bluetooth on and battery being charged.

_small.jpg

Ready for the test ride!

_small.jpg

A view to the app. Olkiluoto 4 is powering my Levo.

_medium.jpg

All done and finalized - ready for the long rides!

I am dealing with a project of the same kind but with the purchase of the bottle already with the cells, my question is the following:
I can use these ideal diodes: 50A Ideal Diode Controller Solar Battery Anti-backflow 9-80V Protection Module
link: 50A Ideal Diode Controller Solar Battery Anti-backflow 9-80V Protection Module | eBay

thanks for listening
 

casco

Member
Mar 4, 2020
19
9
arouca
Couple pictures from my little project

Bottle battery 5Ah - 120$ - alibaba
Quick Shipping 36v Ebike Water Bottle Battery With Usb Port - Buy 36v Bottle Battery,Water Bottle Battery,Ebike Bottle Battery Product on Alibaba.com
Two ideal diodes - 10$ - aliexpress
US $3.22 31% OFF|15A Solar Panel Anti Reverse Irrigation Ideal Diode Battery Charging Board-in Solar Controllers from Home Improvement on AliExpress
Cables (12awg) - found in office
XT60 connectors had home and pins- 5$ - aliexpress
Heat shring 5$ local shop
140$ tolal

Thank you for this thread very useful informations here .
Now enough range for me and I can continue with future battery updates .

View attachment 25695

View attachment 25696
View attachment 25697

Pcb is sealed with silicone
View attachment 25698
and heat shrink
View attachment 25699

View attachment 25700

View attachment 25701
Planning update whole connector on bottle and than shorten cable even more


View attachment 25702
Dremel for smal hole in motor cover

Cable is almost unvisible (if extender not needed)
View attachment 25705

View attachment 25704

I am dealing with a project of the same kind but with the purchase of the bottle already with the cells, my question is the following:
I can use these ideal diodes: 50A Ideal Diode Controller Solar Battery Anti-backflow 9-80V Protection Module
link: 50A Ideal Diode Controller Solar Battery Anti-backflow 9-80V Protection Module | eBay

thanks for listening
 

freerider85

Member
Dec 20, 2018
41
20
canada
I am dealing with a project of the same kind but with the purchase of the bottle already with the cells, my question is the following:
I can use these ideal diodes: 50A Ideal Diode Controller Solar Battery Anti-backflow 9-80V Protection Module
link: 50A Ideal Diode Controller Solar Battery Anti-backflow 9-80V Protection Module | eBay

thanks for listening
Hi yes you can use this 50A is even more than enough .They are little wider but it probably will fit under seat post just look there if you have enough room for this type of diode.
 

casco

Member
Mar 4, 2020
19
9
arouca
Hi yes you can use this 50A is even more than enough .They are little wider but it probably will fit under seat post just look there if you have enough room for this type of diode.


the original battery is 460wh and i will put another 252wh in bottle mode. Won't I have problems with heating on the diodes that I mentioned when I'm just consuming the original battery?

thanks
 

casco

Member
Mar 4, 2020
19
9
arouca
I'm even good with 10 bucks Chinese cheepos they work well not single issue (I have 300km after battery mod) .Its just diode not big deal .


I have one more question:
there are diodes that have in + and out + and in- and out- others have in + and out + and only one gnd, is it the same?

thanks
 

nyx

New Member
Oct 10, 2019
25
60
France
The Turbo levo motor pulls up to 20A in peak on it's last firmware update, so your 50A Ideal diodes (I guess it's 50A continus) won't warm at all in my opinion…
 

RCDallas

Active member
May 28, 2019
152
153
Italy
The Turbo levo motor pulls up to 20A in peak on it's last firmware update, so your 50A Ideal diodes (I guess it's 50A continus) won't warm at all in my opinion…
Resistance over a PN junction should be the same for both the 15 amp and 50 amp diodes so the approximately the same amount of heat will be produced by each diode for a given current. The 50 amp diode has a larger heat sink and should dissipate the heat more rapidly therefore should remain cooler. Having said that, IMHO 50amp diodes are way overkill unless they are to be enclosed with little airflow for heat dissipation.
 

casco

Member
Mar 4, 2020
19
9
arouca
Resistance over a PN junction should be the same for both the 15 amp and 50 amp diodes so the approximately the same amount of heat will be produced by each diode for a given current. The 50 amp diode has a larger heat sink and should dissipate the heat more rapidly therefore should remain cooler. Having said that, IMHO 50amp diodes are way overkill unless they are to be enclosed with little airflow for heat dissipation.


in the case of the turbo levo, the diodes have to be there next to the engine, and consequently they take with the engine heat too ... being that with the original battery it has a peak of 20A, with the diodes of 50A (continuous) it will be more make yourself comfortable. does this perspective make sense?

thanks
 

tim1960

New Member
Mar 4, 2019
3
15
France
hi all,
just wanted to share with you my DIY extender.
Mainly inspired by Villho , but also driven to a DIY solution by the prices for available extenders on the market, I decided to build my own 432 Wh (in theory) battery extender for a total cost of about 120 euros.
I did not prefer the "bottle" solution, so decided to go for a "long-box" design.
All elements are available on the internet and already mentioned in former posts by other members, so no need to repeat.
For the moment it is still a prototype, but first tests were very positif.
Total setup requires no drilling, all cabling is done internally and the connection with the extender is done the same way the derailleur cable and rear brake hose are entering the frame.
Next step is to make a more esthetic "box" and fixture on the frame.
The fixture (clamp ?) will be made of aluminium, but for the final "box" for the battery i'm looking for a solution … probably 3D print, so if you have any advice on that, i'll be glad to read your proposals since i'm total novice into that. I can make (technical) drawings in 2D on computer, but there it ends :)
I also wonder about the section of the electric wiring …. does anyone have an idea of the minimal mm2 of copper-wire required ?

kind regards

Levo 1.jpg


Levo 2.png
 
Last edited:

tim1960

New Member
Mar 4, 2019
3
15
France
Some update on my extender project ...
Finished and tested.
works fine.

Extender.jpg


DSC_1524.JPG

the battery pack and the BMS are moulded in black epoxy which needed some more sanding afterwards


DSC_1525.JPG

the battery holder and cable coming out of 1 of the bottle holder wholes.


DSC_1530.JPG

Extender installed and ready to roll … 504 + 432 = 936 Wh


DSC_1532.JPG
 
Last edited:

EMTB Forums

Since 2018

The World's largest electric mountain bike community.

552K
Messages
27,899
Members
Join Our Community

Latest articles


Top