Ade.Richards
Member
@ Dave_b
do you still produce these or have any available?
thanks ade
do you still produce these or have any available?
thanks ade
Apologies, I had read thru it, but not properly obviouslyI didn’t make them. Read the thread mate. The guy who made them is in NZ.
Hi @RolfRapRap , I’m interested in trying this for my 2023 rail 7 625wh smart system and also on my 2023 rail 9.9 CXR 750wh smart system. The 9.9 has the newThanks for the Feedback @Dave_B !
I found your measurement earlier in this thread and created a second design for the 750 Battery. View attachment 110633
@FastFreddyV -Hi @RolfRapRap , I’m interested in trying this for my 2023 rail 7 625wh smart system and also on my 2023 rail 9.9 CXR 750wh smart system. The 9.9 has the new
Bosch race motor and it will be my race bike this year. I will be trying out to run a 625wh battery for some of the races and some races I’ll be running a 500wh battery. Can we talk possible about making an adapter to make up for the gap from 500 to 750 spacer and 625 to 750?
@FastFreddyV - While the spacer could be done - how would you deal with the different connectors at the bottom of the 750is? Source:Der neue Bosch Performance Line CX Smart System-Motor 2022 im exklusiven ersten Test

I am also looking how to save some weight from the battery cover, it's a massive chunk of weight, pretty sure it's the slotted bars on the back of the cover rather than the alloy cover itself. That's probably a more tricky problem to solve than the battery change/lock removal.
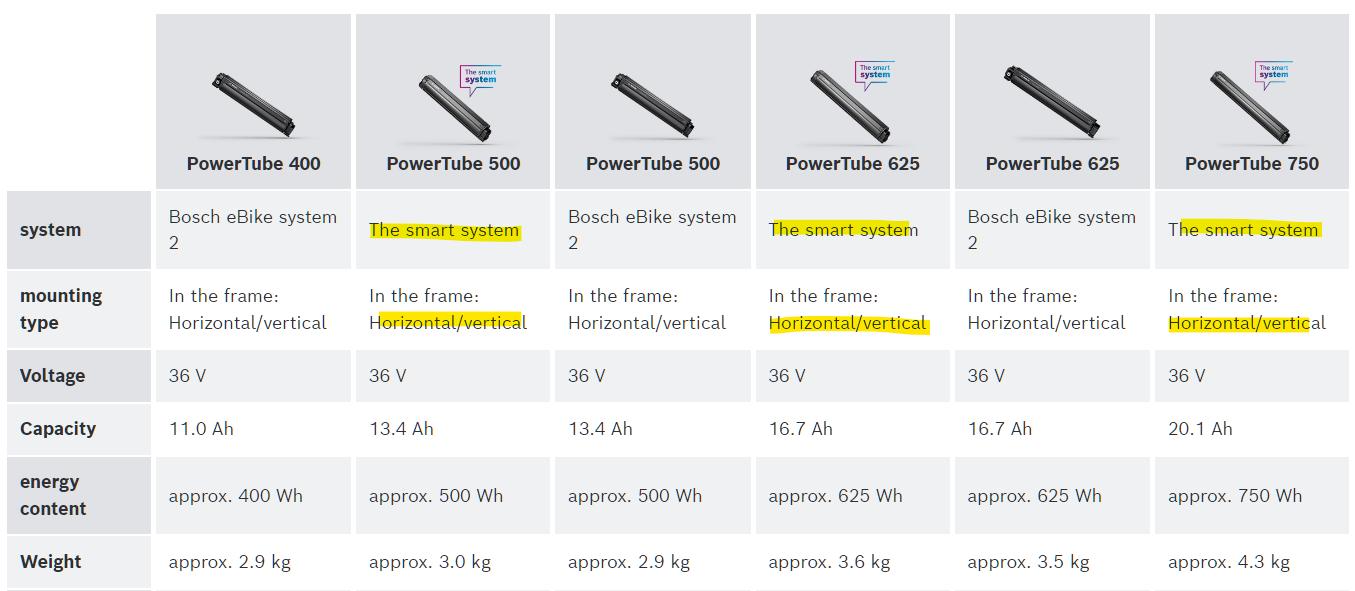
Obviously you must purchase same type of batteries (all three smart system and all three horizontal or vertical)
View attachment 111479
Besides the battery dimension and orientation, as far as I know, Bosch also changed the connection plug
I also am having a hard time PMing you. I sent a message but it looked off. It didn't look like a PM but said posting a message to your profile and when I look in my messages it isn't there.Request for Testers
Inspired by this post, I created a 3D Print Version including the bracket and a keyhole closer. Weight goes from 331gr down to 23gr. So far tested on Rail 9.9 and 9.8, Model Year 2021.
Out for testing on: 2020 Rail 9 - 625Wh, 2022 Rail 9 GX - 625Wh, 2023 Rail 9.8 GX - 750Wh
Drop me a PM, if you would like to test it.
Rules would be:
- I would need your Rail Model, Year, Battery Capacity, as well as your delivery Address.
- Testing audience is limited to the first requester per Model / Year.
- You cover the shipping plus production cost. Total would be for Switzerland CHF 11.0, Europe: 8€ and rest of the World 12$.
- You need a TORX T10, T20, T25H and 2mm allen key as well as some loctite screw lock.
- You will provide helpful feedback. Either a good to go or what would need to be changed to make it work on your bike.
Happy Rail Riding !
View attachment 110406 View attachment 110407 View attachment 110408 View attachment 110409 View attachment 110410
Hi, interested in the bracket if it is reasonable cost, also interested in the cover if you get to that.I am just designing a 3D printed bracket, going to print it in Carbon F so will likely be stronger than the bike itself, i will have two designs one for 500Wh and one for 625Wh battery. For me it's about saving the weight on the smaller battery/lock removal etc. I tend to come back from most rides with at least 50% of battery left so the weight saving is going to be more important for me with no issue on range. I was considering a lighter bike but this will be an ideal solution for me.
I am also looking how to save some weight from the battery cover, it's a massive chunk of weight, pretty sure it's the slotted bars on the back of the cover rather than the alloy cover itself. That's probably a more tricky problem to solve than the battery change/lock removal.
Can you print a cover?? I would really like one of those. I have an idea how to do it. I got the idea from a guy on YouTube. His Rail is 19.11 Kg! He made a carbon cover and just used Velcro. To me the best solution would be to add a little step at the front edge that would go inside the frame in the front only. At the bottom edge or just near the bottom a flat area that would set adjacent to the battery surface and just add a small piece of Velcro. Just need a small nylon strap hanging out at the bottom to grab onto to pull it off or a small slot at the bottom to pry it off.I am just designing a 3D printed bracket, going to print it in Carbon F so will likely be stronger than the bike itself, i will have two designs one for 500Wh and one for 625Wh battery. For me it's about saving the weight on the smaller battery/lock removal etc. I tend to come back from most rides with at least 50% of battery left so the weight saving is going to be more important for me with no issue on range. I was considering a lighter bike but this will be an ideal solution for me.
I am also looking how to save some weight from the battery cover, it's a massive chunk of weight, pretty sure it's the slotted bars on the back of the cover rather than the alloy cover itself. That's probably a more tricky problem to solve than the battery change/lock removal.
I wouldn't want to remove the bottom bracket. These batteries are really heavy and some of us ride over some really rough terrain which puts a ton of force at the top and bottom of the battery. I really want to remove the heavy lock mechanism at the top but I really want a strong carbon printed mount for the replacement.When removing the Battery Lock at the top - is there a specific reason for not also removing the lower docking bracket and Connector Plate? To directly attach the Battery Connection Plug to the battery und use the same Bracket to screw it to the frame?
I haven’t seen a printed version of the battery cover but I’m assuming mine is already carbon. (I hope). You might be able to order just a replacement carbon cover??There is also the cover issue. That bottom mount holds the cover in position. That cover is pretty heavy too. I really wish someone would make a carbon replacement or a printed replacement.
I'm pretty sure they are all aluminum. I have a 9.7 with a carbon front frame and my battery cover is definitely aluminum and it feels fairly heavy. It has long aluminum rails running down each side that run into the battery grooves. I thought I read somewhere that it is about 400 grams, almost a pound!! Seems like a good place to drop some unnecessary weight.I haven’t seen a printed version of the battery cover but I’m assuming mine is already carbon. (I hope). You might be able to order just a replacement carbon cover??
Still waiting for feedback from the testers of the 3D printed bracket done with PETG. If required, there are other options to strengten this 3D print, I would try first prior going the Fibre Filaments. Besides the higher price for carbon filament, it's abrasive, requires special nozzle and preparation. Better strength is not a given in all cases. Here is a good overview, if you are interested: Prusa Material Table | Prusa Knowledge BaseI wouldn't want to remove the bottom bracket. These batteries are really heavy and some of us ride over some really rough terrain which puts a ton of force at the top and bottom of the battery. I really want to remove the heavy lock mechanism at the top but I really want a strong carbon printed mount for the replacement.
I think you’re right. I’ve searched the interweb on my eye-foan and can’t find a carbon cover for sale. There’s only mentioned of a custom built one on a vid, but no instructions, and they say the cover is about 400gms.I'm pretty sure they are all aluminum. I have a 9.7 with a carbon front frame and my battery cover is definitely aluminum and it feels fairly heavy. It has long aluminum rails running down each side that run into the battery grooves. I thought I read somewhere that it is about 400 grams, almost a pound!! Seems like a good place to drop some unnecessary weight.
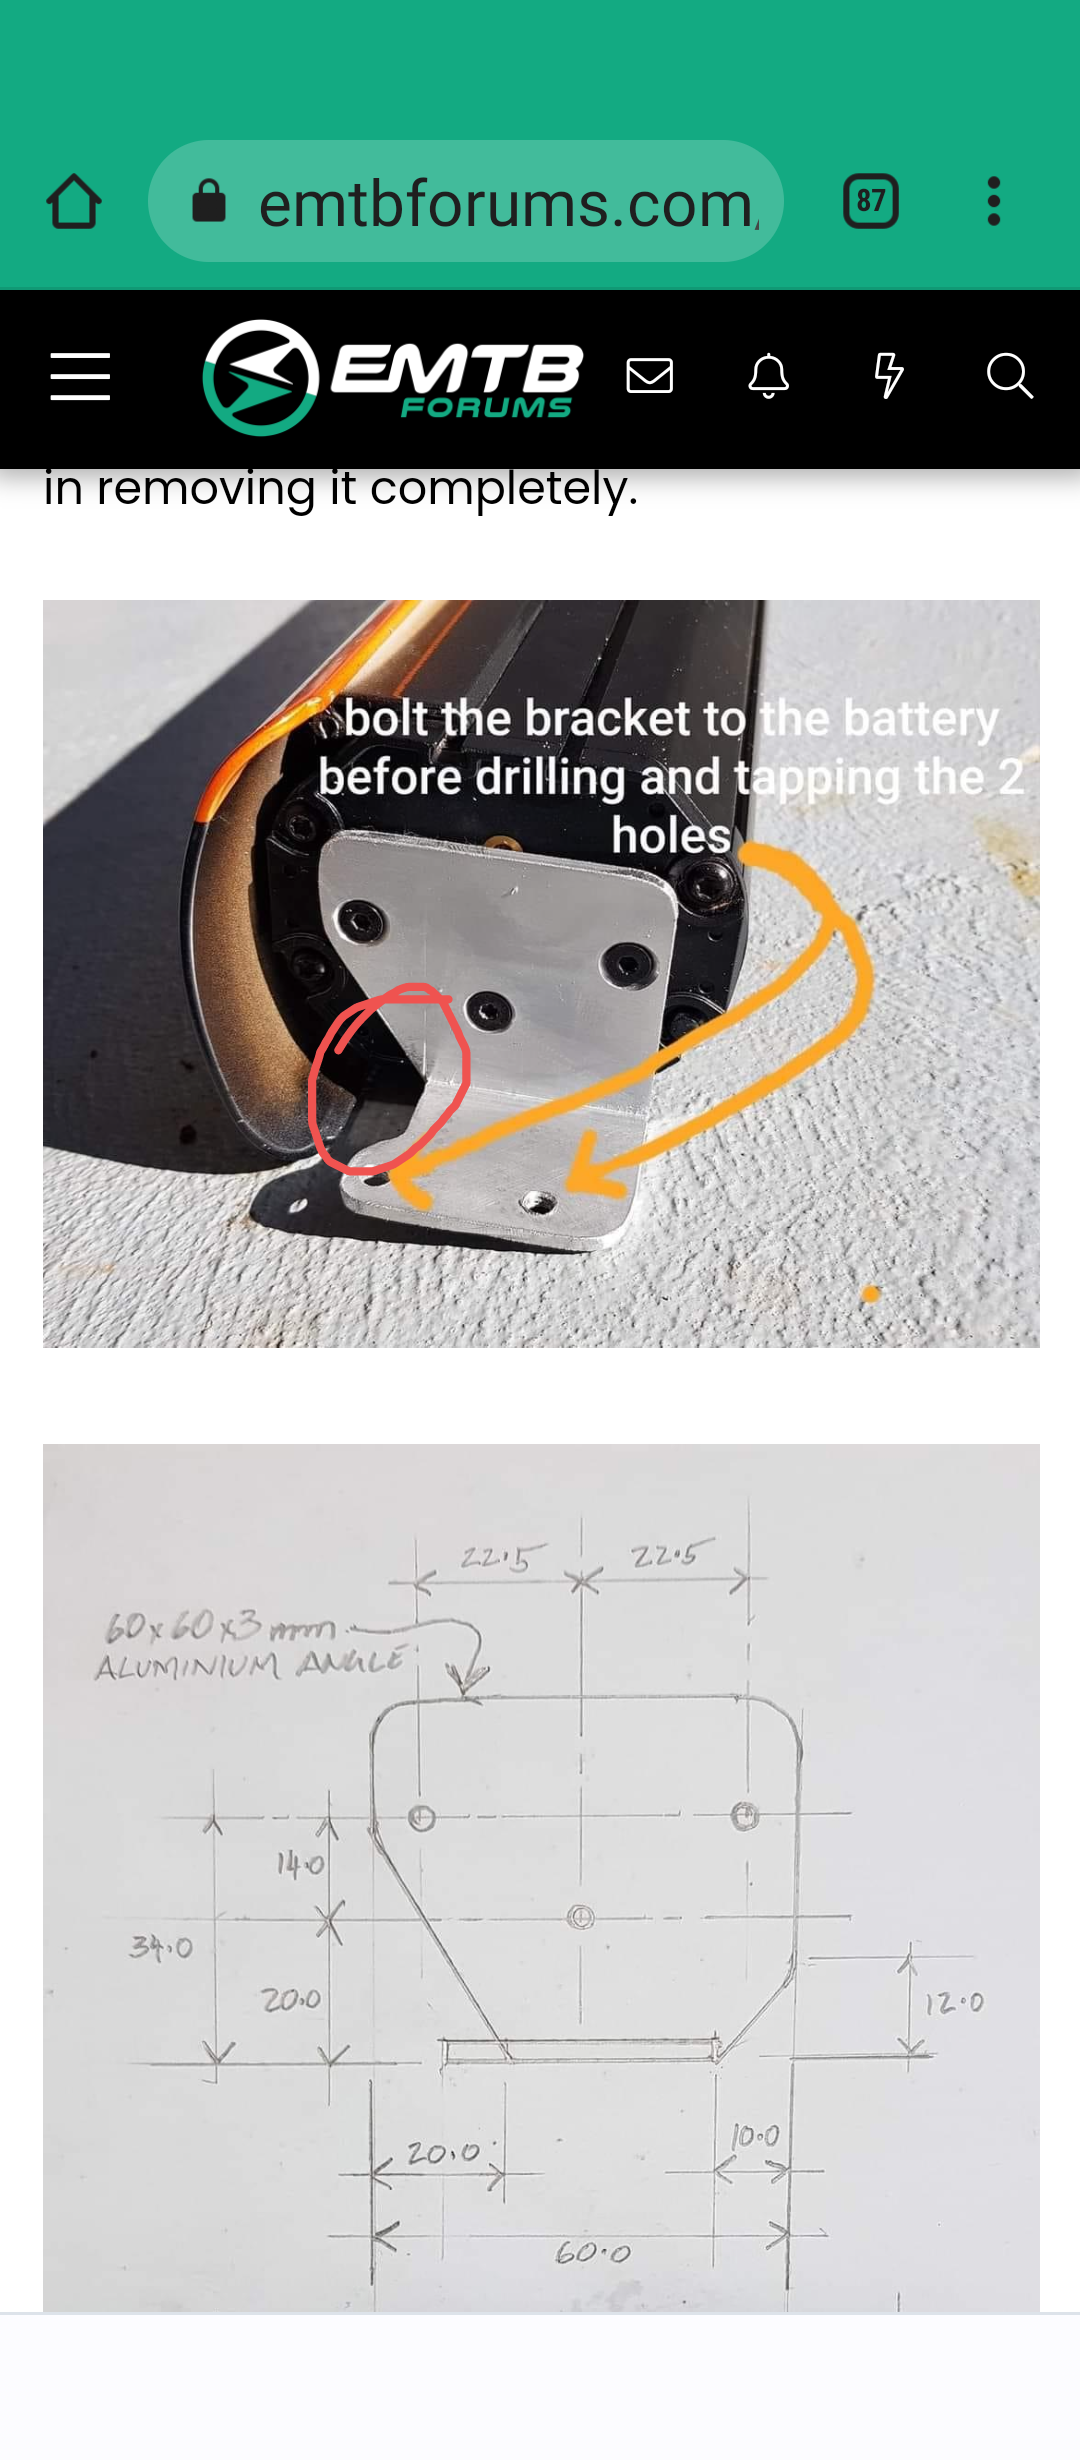
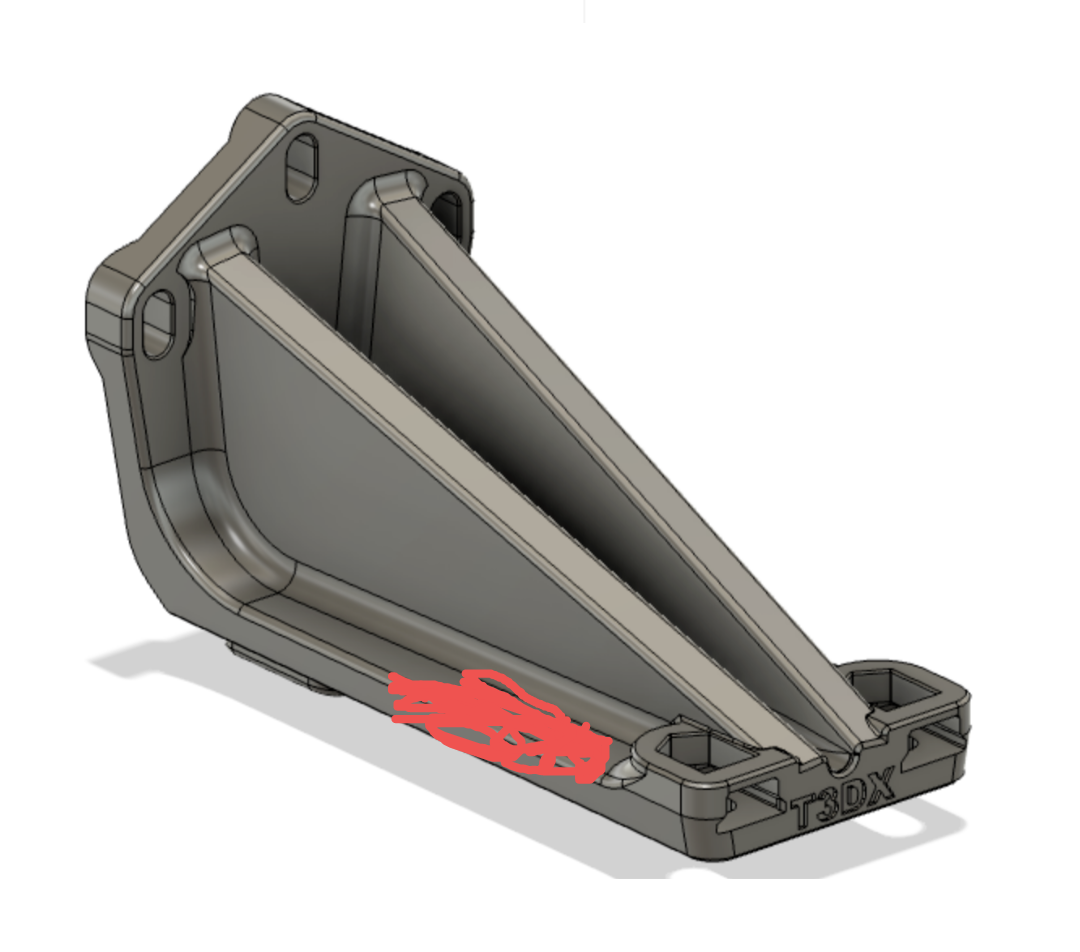
Why not make the area where the bolts go through the frame solid so there would be more thread engagement. Unless that little area is designed to hold a metal nut. Also, please see my photos, it needs the cutout like I circled done in the area I marked on your photo. You have to stick the mount in the frame first and lift the battery high enough to put the bottom in and then drop it down. The more cutout on the mount, the more the battery can be sticking out for you to hold onto while you are getting the bottom into position.for the ones that requested a mount for a 500 instead of the 625 Battery - what do you think about this approch. Basically the same mount as for the 625 (Non-Smart), just 67mm longer and I've added an additional „feet“ that allows energy absorption to the frame closer the battery.
View attachment 113187 View attachment 113188


What is the idea here? Do you thread the mount? If so making this solid for more thread engagement is what I was talking aboutfor the ones that requested a mount for a 500 instead of the 625 Battery - what do you think about this approch. Basically the same mount as for the 625 (Non-Smart), just 67mm longer and I've added an additional „feet“ that allows energy absorption to the frame closer the battery.
View attachment 113187 View attachment 113188
I like having a metal nut in there. You can probably still get it in there without the cutout, just much harder. The battery is heavy and the more the cover is sticking out from the frame the easier it is to hold onto. I would at least make that side as thin as possible. Without actually trying it I can't say for sure but if you read back in the thread the problem was enough that one guy even designed his to have only one bolt through the frame.the cutout would be easy to add. But I'm not sure, if it's required and it will for sure limit the stiffness.
Compared to the original design with standard nut, I've change to the one with a flange. I would not trust a M5 thread directly in the 3D print. Based on feedback, I've also adjusted the mount to the battery. This will allow some up/down adjustment. And I've changed the Print direction.
View attachment 113193
The World's largest electric mountain bike community.