Invisiframe is it tricky to do yourself?

Andy A

Well-known member
Patreon
Jan 13, 2019
493
283
North Yorkshire
Hi guys Linda has a new Levo Comp on order and even though we don't normally protect our bikes I have read that the Levo paint seems to chip a bit too easily so is Invisiframe easy enough to fit yourself bear in mind I have never done this before and I don't want to mess it up :)
 
Last edited:

Drburns

New Member
Nov 22, 2018
35
41
USA
If you’ve never applied vinyl wrap or paint protection on a car or some car parts, then I would say it’s not an easy project to learn on. It is somewhat tedious and there’s a lot of tough contours. You need a very clean, dust free area to apply it cleanly, otherwise you’ll see little specs of dust or hair under the wrap. A heat gun comes in handy as well. That being said, it’s not impossible and I highly recommend it. It works really well and literally invisible. I did it on my Levo Expert, and it came out pretty good, but I’ve applied vinyl/paint protection films before.
 

Andy A

Well-known member
Patreon
Jan 13, 2019
493
283
North Yorkshire
If you’ve never applied vinyl wrap or paint protection on a car or some car parts, then I would say it’s not an easy project to learn on. It is somewhat tedious and there’s a lot of tough contours. You need a very clean, dust free area to apply it cleanly, otherwise you’ll see little specs of dust or hair under the wrap. A heat gun comes in handy as well. That being said, it’s not impossible and I highly recommend it. It works really well and literally invisible. I did it on my Levo Expert, and it came out pretty good, but I’ve applied vinyl/paint protection films before.


Ahh ok thanks for that I haven't done anything like that before, I wonder how much the bike shop will charge to do it!
 

Dax

E*POWAH Elite World Champion
May 25, 2018
1,726
2,112
FoD
Take a look on the invisiframe site, they have a map of places that will fit it across the country.

It's not a quick job, I got an experienced vinyl guy to do my bike and it took a couple of hours. Would probably have taken me all day!
 

steve_sordy

Wedding Crasher
Nov 5, 2018
9,008
9,435
Lincolnshire, UK
Get yourself some bike tape and apply it just where you need it. If it gets damaged, peel it off and put some more on. Double up on the danger areas.
 

DAZ1925

Member
Nov 7, 2018
75
42
UK
I've done it to a couple of bikes now and I thought it was pretty simple, I used the method with soapy water as it allows you to re position the film if needed then just use the supplied squeegee and work from the middle out.
 

Andy A

Well-known member
Patreon
Jan 13, 2019
493
283
North Yorkshire
I've done it to a couple of bikes now and I thought it was pretty simple, I used the method with soapy water as it allows you to re position the film if needed then just use the supplied squeegee and work from the middle out.

Sounds simple but I bet it would take me hours and hours also I don't have a bike stand to hold it so I would just have to lean it in the garage, oh can you do it with the wheels on or do they have to be off?
 

Andy A

Well-known member
Patreon
Jan 13, 2019
493
283
North Yorkshire
Get yourself some bike tape and apply it just where you need it. If it gets damaged, peel it off and put some more on. Double up on the danger areas.

I know that's what I should do as it will be cheaper and a lot less hassle and probably not far off as good a job :)
 

DAZ1925

Member
Nov 7, 2018
75
42
UK
Sounds simple but I bet it would take me hours and hours also I don't have a bike stand to hold it so I would just have to lean it in the garage, oh can you do it with the wheels on or do they have to be off?

I didn't use a bike stand, just turned the bike upside down.
 

DAZ1925

Member
Nov 7, 2018
75
42
UK
Ahh ok wheels on or off?

Didn't really need to remove the wheels but I think I may of. It helps if you are willing to cut any cable ties on the brake and shifter cables then refix them afterwards. I used Johnsons baby shampoo as I think you need a neutral ph soap. just keep your hands and the frame slightly wet.

I used a spray bottle to wet down the frame just before applying the invisiframe and placed the invisframe into a soapy solution in a washing up bowl. Start off with the smaller less complex patches to get the feel of it.

I think it recommends you do it in a fairly warm place to keep the invisiframe flexible. If you haven't or can't put a screen protector on a phone, maybe it's best you leave it to someone else to fit, just a thought.
 
Last edited:

MattyB

E*POWAH Elite World Champion
Jul 11, 2018
1,274
1,301
Herts, UK
I second the helitape + warm water with a drop of washing up liquid method. It took me a couple of hours to do all the key areas of my last analog bike, and personally I don't think the result is any worse than Invisiframe which would have been a lot more expensive. IMO you do need a bike stand though - it's very helpful to be able to move all around the bike and put it into unusual angles to make application easier, whilst always being confident there is no danger of it tipping over.
 
Last edited:

MattyB

E*POWAH Elite World Champion
Jul 11, 2018
1,274
1,301
Herts, UK
Not what I have used so far, no*. I did buy the "proper" 3M stuff though that is thicker and more expensive - I have had very good experiences with their products in aeromodelling, where I have used their tapes to create hinges for flying surfaces that need to go through thousands of delections and are exposed to a lot of UV.

* Edit - Ok, a slight caveat... my analog bike is a luminous green colour, so any yellowing of the Helitape would probably be near invisible in all but the brightest light.
 

All Mountain Coaching

E*POWAH Elite
Oct 3, 2018
1,332
980
GB
To answer your question, yes it is tricky. It'll take you a long time. I'm sure there's an Emtb Forums video from Rob applying this.

I'd rather pay to have it fitted and done right than looking at a bodge job daily.
 

steve_sordy

Wedding Crasher
Nov 5, 2018
9,008
9,435
Lincolnshire, UK
I have used heli-tape in two different thicknesses and from a variety of suppliers, but over time I have come to rely upon bike tape from bike tart. This has never gone yellow on any bike I have applied it to, but the longest time I've had a bike with it on is three years, so I guess there's time!

Biketape - Protect your bike from chips and scratches

PS: I have a two-page guide to applying bike tape. I wrote it initially after I'd done a few bikes, but once I'd shared it, I incorporated the feedback I got and so now it is a joint effort. Anyone that wants a free copy just contact me via the conversation method and let me have your email address. I will email you a Word file by return. Several emtb Forum members have already been sent a copy.
 

steve_sordy

Wedding Crasher
Nov 5, 2018
9,008
9,435
Lincolnshire, UK
That is the the one I have settled on, definitely the mutts nuts of protective tapes!
That is the thick stuff. The backing tape is easy to remove, but make sure that you have a hairdryer on hand to help form the tape around the bends and flared bits. Slow and steady does it! :)
 

xcentric

New Member
Feb 2, 2019
197
126
Market Drayton
am going to try to apply invisiframe this weekend so will try to photograph some parts of it and share experiences here. If it';s a disaster and recorded and makes you laugh, I might collect donations towards helitape - and if it works, then everyone is happy :)
 

Andy A

Well-known member
Patreon
Jan 13, 2019
493
283
North Yorkshire
am going to try to apply invisiframe this weekend so will try to photograph some parts of it and share experiences here. If it';s a disaster and recorded and makes you laugh, I might collect donations towards helitape - and if it works, then everyone is happy :)


That would be great to see and hear your thoughts :)
 

Decca

Member
Sep 30, 2018
59
40
Guisborough
I did mine myself. Not too difficult, just a bit tedious. Just take your time and use lots of water diluted with Johnsons Baby Shampoo. I found that there is an ideal order of fitting each piece so that you don't have pieces overlapping each other. Also, it's best to not butt pieces directly together. Have a small 1mm or so gap. I did the very large downtube piece last, and if I recall, it would have been better to do that part before the pieces that are adjacent to it.

I've used helitape in the past, but found it too thick. Invisiframe is more flexible.
 

Casey

Member
Oct 31, 2018
49
34
Seattle, WA USA
I just got my bike and installed invisiframe last night. It took 3hrs and was pretty easy if you follow the instructions and have patience. When I tried rushing I noticed it started to get frustrating. I say if you can commit to 4hours to do it and take your time your good. If that seems way too long you might want to hire it out.
 

Steven1980

New Member
Mar 13, 2019
10
4
trondheim
have used invisiframe on three bikes and works really well - just follow the instructions regarding cleaning first and getting the soapy water at the right concentration.

Also do it inside with warm bike and invisiframe!
 

Andy A

Well-known member
Patreon
Jan 13, 2019
493
283
North Yorkshire
have used invisiframe on three bikes and works really well - just follow the instructions regarding cleaning first and getting the soapy water at the right concentration.

Also do it inside with warm bike and invisiframe!

Thanks but all I have is our garage as it will not be possible doing it inside due to mess and our oak hardwood floor!
 

Stumpy

E*POWAH Elite World Champion
Staff member
Patreon
Jun 17, 2018
644
622
Essex, UK
I’m rubbish at most things like that usually and I did mine OK. As others have said, plenty of Johnson’s baby shampoo diluted with water, as per the instructions, in a spray bottle and keep tape, bike and hands wet at all times. The more you do the better you get at judging the ‘wetness’ which saves work squeegying (sp?) the residue out. I did mine in the garden with the bike propped against the fence in the blazing sunshine, which made life a bit more difficult as the big bits were drying quicker than I would have liked. I had to take the back wheel off to get to a bit on my kit that went at the back of the U bend in the chain stay. Took me about 3 hours - got a good suntan ?
 

muzzman1

Active member
Feb 11, 2019
153
140
Los Angeles CA
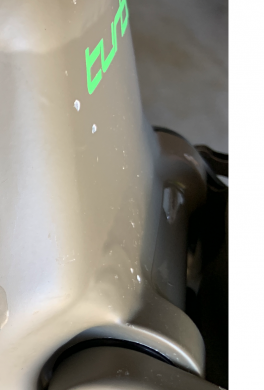
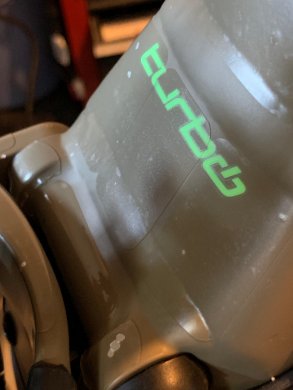
I installed my kit today on my 2019 Comp. I learned about invisiframe a bit too late as I have already accumulated quite a few chips in my chain stay bridge and my upper chain stay bridge. (See photo)
The sad thing is the kit did NOT come with protection in the two places I wanted it most. Directly in front of the rear tire there the (turbo) decal is on the bike and the upper chain stay bridge.
Everything else fit well, and I ended up improvising with the small square spare pieces of film to cover those areas. ( you can see the poorly fitted square film on the 2nd photo) unnamed.png unnamed.jpg
 

EMTB Forums

Since 2018

The World's largest electric mountain bike community.

555K
Messages
28,049
Members
Join Our Community

Latest articles


Top